
BuzzSkito Mosquito & Tick Control Specialists · Published July 21, 2026
Reading from the United States? Product rules and what is sold there differ. See the US edition.
Why Getting Rid of Bed Bugs Takes a Plan, Not a Product
The reason bed bugs have a reputation for being impossible to beat is not that they are indestructible — it is that people fight them the wrong way. They buy a can of spray or a fogger, treat the mattress, feel a few days of relief as the visible bugs die, and then get bitten again a week later when the eggs hatch. The bugs were never the hard part; the eggs are. Female bed bugs cement their eggs into fabric seams, screw holes, and cracks with a glue-like coating, and those eggs shrug off nearly every spray, fog, and powder on the market. Only sustained heat reliably kills them. So a plan that ignores the eggs is a plan that fails on a two-week delay, every time. Finding a translucent 1–2 mm insect rather than an adult changes the reading of the situation as well: a nymph means the bugs are breeding on site, not merely hitchhiking in.
The good news is that a proper plan is not complicated — it is just several simple things done together and repeated. This guide is the map. It is deliberately a cornerstone: each step below has a dedicated deep-dive guide, and you should follow those links when you reach the step that applies to you. Read this once to understand the whole shape of the fight, then work the steps in order.
The four tools every Canadian bed-bug plan is built on — check current availability:
Step 1: Confirm It’s Bed Bugs and Map Where They Hide
Before you spend a dollar, confirm what you are dealing with. Bed bug bites are easy to mistake for flea bites, mosquito bites, or a skin reaction, and the treatment for each is completely different. The bites themselves are not a reliable diagnosis — you need to find the bugs or their evidence. Look for live bugs (flat, rusty-brown, apple-seed sized adults), pale sticky eggs in the seams, dark ink-dot fecal spots along the mattress piping and box-spring edge, and shed skins. Our guides on how to check for bed bugs and on what bed bug bites look like walk through the identification in detail, and a bed bug detector or monitor can confirm a low-level infestation you cannot see.
Once confirmed, map the harbourage. Bed bugs cluster within a few metres of where you sleep. Check the mattress seams and tufts, the box spring (peel back the dust cover), the bed frame joints and bolt holes, the headboard and any cracks in it, the nightstand, the baseboards nearest the bed, and the seam where carpet meets wall. Knowing where they are turns the rest of the plan from guesswork into targeting.
Step 2: Isolate the Bed So the Bites Stop Tonight
You do not have to wait weeks for relief. You can stop the bites almost immediately by turning the bed into an island the bugs cannot reach. Pull the bed a few centimetres away from the wall and away from the nightstand. Make sure no blankets, skirts, or bedding touch the floor — anything that bridges the bed to the ground is a highway. Then put a bed bug interceptor trap under every leg of the bed. The bug tries to climb the leg, slides into the slick-walled pit, and cannot get out.
Interceptors do double duty. Beyond isolation, they are the best monitoring tool in the entire plan. Every week you count what is in the cups, and that count tells you plainly whether you are winning. A treatment that is working shows a falling catch; a treatment that is not shows a steady or rising one. Leave the interceptors in place for the entire fight and well beyond it — permanently, ideally, as an early-warning system.
Step 3: Encase the Mattress and Box Spring
The mattress and box spring are prime harbourage, full of exactly the seams and folds bed bugs love. Rather than throw them out — which rarely helps and risks spreading the infestation — seal them. A quality bed bug mattress encasement is a zippered, bite-proof cover that does three things at once: it traps any bugs and eggs already inside where they will eventually starve and die, it blocks new bugs from moving in, and it eliminates hundreds of hiding seams by giving you one smooth surface. Encase both the mattress and the box spring, and leave the encasements on for at least a year, which is roughly how long trapped bugs can survive without feeding. This single step is the highest impact-per-dollar move in the whole plan.
Step 4: Launder and Heat-Treat Everything You Can
Heat is your primary weapon, and the first heat tool costs nothing: your clothes dryer. Strip all bedding, clothing from the affected room, curtains, and soft items, bag them at the source so you do not spread bugs on the way, and run everything through the dryer on high heat for 30 to 40 minutes. The heat kills every life stage including the eggs. Washing first is optional; it is the dryer heat that does the killing, so even dry-clean-only items that tolerate a no-heat wash can often take a dryer cycle — check the label.
For everything you cannot put through a dryer — shoes, books, luggage, stuffed toys, electronics-free belongings — a heat chamber is the answer. A box or garment heater raises the whole load to lethal temperature and holds it there. This is how you treat the belongings that would otherwise reinfest a room you just cleaned. Our guides on the best whole-room heaters, the PackTite closet, the ThermalStrike Ranger, and the ZappBug Oven 2 cover the full range from a single suitcase to an entire bedroom, and the broader DIY heat-treatment guide explains the temperatures and dwell times that actually kill.
Step 5: Steam the Seams, Cracks, and Frame
A heater treats things you can put inside it. A steamer treats everything you cannot — the mattress seams (before you encase), the box-spring edge, the bed-frame joints, headboard cracks, baseboards, and the carpet edge around the bed. A dry-vapour steamer produces heat above 100 C and drives it directly into the folds and voids where bugs and eggs hide, killing on contact. Move the steamer head slowly — a few centimetres every several seconds — so the heat penetrates rather than skimming. Fast passes are the most common reason steam “misses.” Our steamer roundups, including the Dupray and Vapamore MR-100 reviews and the Dupray vs McCulloch comparison, cover which machines deliver the dry, high-temperature vapour this job needs.
Step 6: Dust the Voids with a Long-Lasting Desiccant
Heat and steam kill what you can reach today, but bed bugs also hide in wall voids, behind outlet plates, under baseboards, and inside furniture where neither heat nor steam reaches easily. That is the job of a residual desiccant. A silica-based dust like CimeXa laid down as a thin, almost invisible film keeps killing for months — any bug that crosses it dehydrates and dies. Apply it lightly: a visible pile of dust actually repels bugs and they walk around it, whereas a barely-there film they cannot detect is what works. Target the cracks, outlet gaps, baseboard edges, and voids around the bed. Diatomaceous earth works on the same drying principle more slowly and is the natural alternative, and if you prefer to avoid dusts entirely our guides on natural bed bug sprays and on whether sprays actually work set honest expectations for what liquids can and cannot do.
Step 7: Monitor Your Way to Zero
This is the step people skip, and skipping it is why infestations “come back.” They did not come back — they were never fully gone, because the plan was run once instead of repeated. Bed-bug eggs hatch over one to two weeks, so survivors keep emerging after your first treatment. Repeat the active steps — steam, re-launder any re-exposed items, refresh the dust — on a weekly cadence for at least three to four weeks, and check your interceptor traps every time. When the catch reaches zero and stays there, keep monitoring for another two to three weeks of clean traps and no bites before you call it. Only then is it truly over. Leave the encasements and interceptors in place long after, as your permanent early-warning system.
How to Choose Your Kit: What You’re Actually Paying For
Bed-bug tools span a wide price range, and it is worth knowing where the money genuinely matters versus where you can economise. Prioritise your spending in this order:
- Encasements and interceptors first (cheap, essential). These are the lowest-cost, highest-impact items and they deliver the fastest relief. Buy them on day one no matter what else you do.
- A steamer second (mid-cost, does the killing you can’t heat). This is the tool that reaches the seams and cracks. A capable dry-vapour machine is worth paying for; the cheapest handheld steamers often lack the sustained temperature and dry output to kill reliably.
- An enclosed heater third (higher-cost, scales to the problem). A box or garment heater handles belongings; a whole-room heater is the DIY equivalent of a professional treatment for a heavy infestation. Match the heater size to your infestation — a suitcase problem does not need a room heater, and a whole-bedroom problem is not solved by a small box.
- Silica dust throughout (cheap, long-lasting). A single container lasts through the whole fight and beyond. Inexpensive and worth having in every plan.
- Detectors and monitors (optional, useful for low-level or apartment cases). Helpful when you suspect bugs but cannot find them, or want early warning after travel. Not essential to the kill, but valuable for confirmation and monitoring.
The way people overspend is buying a big whole-room heater for a problem a steamer and dryer would have handled; the way people underspend is skipping the heat entirely and hoping a spray does it — which lands them back at bug number one a fortnight later. Buy the encasements and interceptors always, buy the heat appropriate to your infestation, and dust the voids. That is the whole budget.
DIY vs Professional: An Honest Call
You can do this yourself, and for a single-room infestation caught early, DIY has a genuinely high success rate when you follow the plan with discipline. Our DIY bed-bug guide and the guide on killing bed bug eggs go step by step through doing it without a professional. Choose DIY when the infestation is contained, you can find the harbourage, and you have the time and patience for several weeks of methodical work.
Call a professional when the infestation has spread across multiple rooms, when you are in an apartment or condo where shared walls let neighbours re-seed your unit, when physical limitations make deep cleaning and heat treatment impractical, or when you have run the full plan correctly for a month and are still being bitten. A professional whole-home heat treatment kills every bug and egg in a single day because heat reaches everywhere at once — something DIY approximates but rarely matches. There is no shame in escalating; bed bugs are one of the hardest household pests to clear, and knowing when to bring in help is part of a good plan, not a failure of one.
A Note on Canadian Products and the Law
Products you spray or dust to kill pests are regulated in Canada under the Pest Control Products Act and must be registered with Health Canada’s Pest Management Regulatory Agency (PMRA), carrying a PCP registration number. Many US bed-bug sprays, concentrates, and dusts promoted on American forums are not registered for sale or use in Canada, and importing or using them is not legal here — some contain actives Canada has restricted. Stick to products listed on Amazon.ca and Canadian retailers, and lean on the parts of this plan that sidestep the question entirely: heaters, steamers, encasements, and interceptors are devices, not pesticides, so they carry no registration friction at all. That is another reason the heat-first approach is the right one for Canadian homes — it is both the most effective and the most straightforwardly legal.
Frequently Asked Questions
How do you get rid of bed bugs in Canada?+
Getting rid of bed bugs takes a coordinated plan, not a single product. The reliable Canadian approach is: confirm the infestation and map where the bugs hide, reduce clutter and launder or heat-treat all bedding and clothing, encase the mattress and box spring, put interceptor traps under every bed and furniture leg, then hit every seam and crack with heat — a steamer for fabric and a whole-room or box heater for infested items — and follow up with a residual dust like silica in the wall voids and behind baseboards. You repeat the active steps weekly for at least three to four weeks because eggs keep hatching. Heat and physical removal do the killing; encasements and interceptors protect the bed and let you monitor progress. Do not rely on a single fogger or a single spray — bed bugs survive both, and the eggs survive almost everything except sustained heat.
Can you get rid of bed bugs yourself, or do you need a professional?+
You can absolutely do it yourself for a small-to-moderate infestation caught early, and thousands of Canadians do it successfully every year with heat, encasements, interceptors, and diligence. DIY works best when the infestation is limited to one bedroom, you can identify the harbourage, and you are willing to be methodical and patient over several weeks. Call a professional when the infestation is widespread across multiple rooms, when you live in an apartment or condo where units share walls, when you have physical limitations that make deep cleaning and heat treatment impractical, or when you have done everything right for a month and are still getting bitten. A professional heat treatment or a properly executed chemical program can end a heavy infestation faster than DIY. Our companion guide on doing it yourself walks through the full DIY sequence in depth.
What actually kills bed bugs and their eggs?+
Heat is the most reliable killer of both bed bugs and their eggs. Sustained temperatures around 50 C (122 F) held for long enough kill all life stages, which is why a dryer on high heat, a steamer producing dry vapour above 100 C, and a dedicated heat chamber or whole-room heater are the backbone of any real plan. Freezing works too but is slow — items need days at around minus 18 C. Among products you spray or dust, a silica-based desiccant like CimeXa reliably kills bugs that walk across it over hours to days and keeps working for months, and diatomaceous earth works on the same principle more slowly. Most contact sprays kill the bugs they directly soak but leave the eggs untouched, which is the single biggest reason spray-only attempts fail. The winning combination is heat for the eggs and hidden bugs, plus a long-lasting desiccant dust in the voids for the stragglers.
How long does it take to get rid of bed bugs?+
For a DIY treatment done well, expect three to six weeks to reach zero activity, sometimes longer for a heavier infestation. The timeline is driven by the egg cycle: eggs you cannot reach hatch over one to two weeks, so even a perfect first treatment leaves survivors that emerge days later. That is why the plan repeats weekly and why interceptor traps matter — they let you see, week over week, whether the numbers are falling. A professional heat treatment can kill every live bug and egg in a single day because heat penetrates everywhere at once, but even then you keep monitoring for a few weeks to be sure nothing was carried back in. Do not declare victory until you have gone two to three consecutive weeks with no bites and clean interceptor traps.
Do bed bug sprays and foggers actually work?+
Foggers (bug bombs) are the worst choice — the mist settles on surfaces but does not penetrate the cracks and seams where bed bugs hide, it does not kill eggs, and it can actually scatter the bugs deeper into walls and adjacent rooms. Skip them entirely. Contact sprays have a narrow, legitimate role: they kill bugs you spray directly, which is useful during a treatment, but they do nothing to eggs and leave no meaningful barrier once dry. The residual products worth using in Canada are desiccant dusts, not liquid sprays, because they keep killing for months. If you want a spray in your kit, treat it as a spot tool for visible bugs, never as the whole plan. Our separate guides on whether bed bug sprays work and on natural sprays cover exactly where each fits.
What are bed bug interceptor traps and do I need them?+
Interceptor traps are shallow plastic dishes that sit under each leg of the bed and other furniture. The bug tries to climb up into the bed or down from it, falls into a slick-walled pit it cannot escape, and gets trapped. They do two vital jobs: they physically isolate the bed so bugs cannot reach you while you sleep, and they are the single best monitoring tool you have — checking the cups tells you whether bugs are still active and whether your treatment is working. Yes, you need them. They are inexpensive, passive, and they turn the invisible question of am I making progress into something you can literally count. Pair them with pulling the bed away from the wall and keeping bedding from touching the floor so the interceptors are the only route to you.
Should I throw out my mattress if I have bed bugs?+
Usually no. Throwing out a mattress rarely solves the problem because the bugs are also in the frame, the box spring, the baseboards, and the walls — and a discarded mattress can spread the infestation to neighbours or get picked off the curb by someone else. The better move is to treat the mattress with heat or steam, then seal it inside a bed-bug-proof encasement. A quality encasement traps any bugs or eggs remaining inside where they eventually die, blocks new bugs from getting in, and gives you a smooth surface with no seams to hide in. Only replace a mattress if it is already old and worn out, and if you do, immediately encase the new one from day one. Never buy a used mattress during or after an infestation.
How do I stop bed bugs from biting me while I treat the room?+
Isolate the bed and make it an island. Pull it a few centimetres away from the wall and away from any nightstand, make sure no bedding, skirts, or blankets touch the floor, and put an interceptor trap under every leg so the only path to you runs through a trap the bugs cannot cross. Encase the mattress and box spring so anything living inside cannot reach the surface. Keep sleeping in the bed — an empty bedroom just drives the bugs to find you in the next room and makes the infestation harder to corner. With the bed isolated and encased, the bites drop off quickly even though the treatment takes weeks to finish.
What is the difference between heat treatment options for DIY?+
There are four heat tiers. A clothes dryer on high heat is free and handles all washable and dryable fabrics — run infested items 30 to 40 minutes and the eggs die. A garment or box heater (the classic ZappBug-style oven) heats loose items, luggage, shoes, books, and electronics-free belongings up to lethal temperature and is ideal for treating everything you cannot launder. A larger closet or portable room heater treats furniture and bulk items. A whole-room heater raises an entire bedroom to lethal temperature and is the closest DIY equivalent to a professional treatment. A steamer is the fourth tool and is different: it delivers heat directly into seams, tufts, and cracks where bugs and eggs hide but where you cannot fit an item into a heater. Most successful DIY plans use the dryer plus a steamer plus one enclosed heater, escalating to a room heater for stubborn cases.
Are the bed bug products sold in Canada different from US ones?+
Yes, and it matters. Pest-control products sold legally in Canada must be registered with Health Canada under the Pest Control Products Act and carry a PCP registration number. Many popular US bed bug sprays, dusts, and concentrates you will see on American forums or US Amazon are not registered here and are technically not legal to import or use in Canada, and some contain active ingredients Canada has restricted. The practical upshot: stick to products available on Amazon.ca and Canadian retailers, prefer devices and desiccants (heaters, steamers, encasements, interceptors, and silica dust) that sidestep the registration question or are clearly registered, and be skeptical of any grey-market US concentrate promising a miracle. Devices like heaters and steamers are appliances, not pesticides, so they carry no registration friction at all.
How do I get rid of bed bugs in an apartment or condo?+
Apartments are harder because bed bugs travel through shared walls, outlets, and baseboards between units, so even a perfect treatment in your unit can be re-seeded by a neighbour. Notify your landlord or property manager in writing immediately — in most Canadian provinces they have a legal obligation to address pest infestations in the building, and coordinated treatment of adjacent units is far more effective than treating yours alone. Do your own interior work in parallel: encase, intercept, heat-treat, and dust. Seal gaps around baseboards, outlets, and pipe penetrations to slow migration between units. Because the building dimension is out of your hands, apartment infestations are the scenario where professional, building-wide treatment most often becomes necessary. Our dedicated apartment guide covers the tenant-landlord side in detail.
How do I keep bed bugs from coming back?+
Prevention is mostly about interception and vigilance. Keep the mattress and box spring encased for at least a year — the recommended lifespan of a quality encasement — and leave interceptor traps under the bed legs permanently so you get early warning of any new arrival. Inspect luggage, and ideally run it through a box heater, after any hotel stay or travel. Be cautious with second-hand furniture and never take mattresses or upholstered items off the curb. When you travel, keep your suitcase off the floor and away from the bed, and check the mattress seams of any bed you sleep in. Bed bugs are almost always brought in from outside, so the household that inspects luggage and keeps interceptors in place is the household that catches the next one at bug number one instead of bug number five hundred.
Related Reading
- Bed Bug Control Canada — The Complete Hub
- How to Get Rid of Bed Bugs Yourself (DIY) in Canada
- How to Get Rid of Bed Bugs in an Apartment or Condo
- How to Kill Bed Bug Eggs — The Heat That Works
- DIY Bed-Bug Heat Treatment — Temperatures and Dwell Times
- Best Bed-Bug Steamer Canada
- Bed-Bug Interceptor Traps Canada
- Bed-Bug Mattress Encasement Canada
- How to Check for Bed Bugs Canada
- Best Pest Control Equipment Canada — The Device Hub
Keep reading
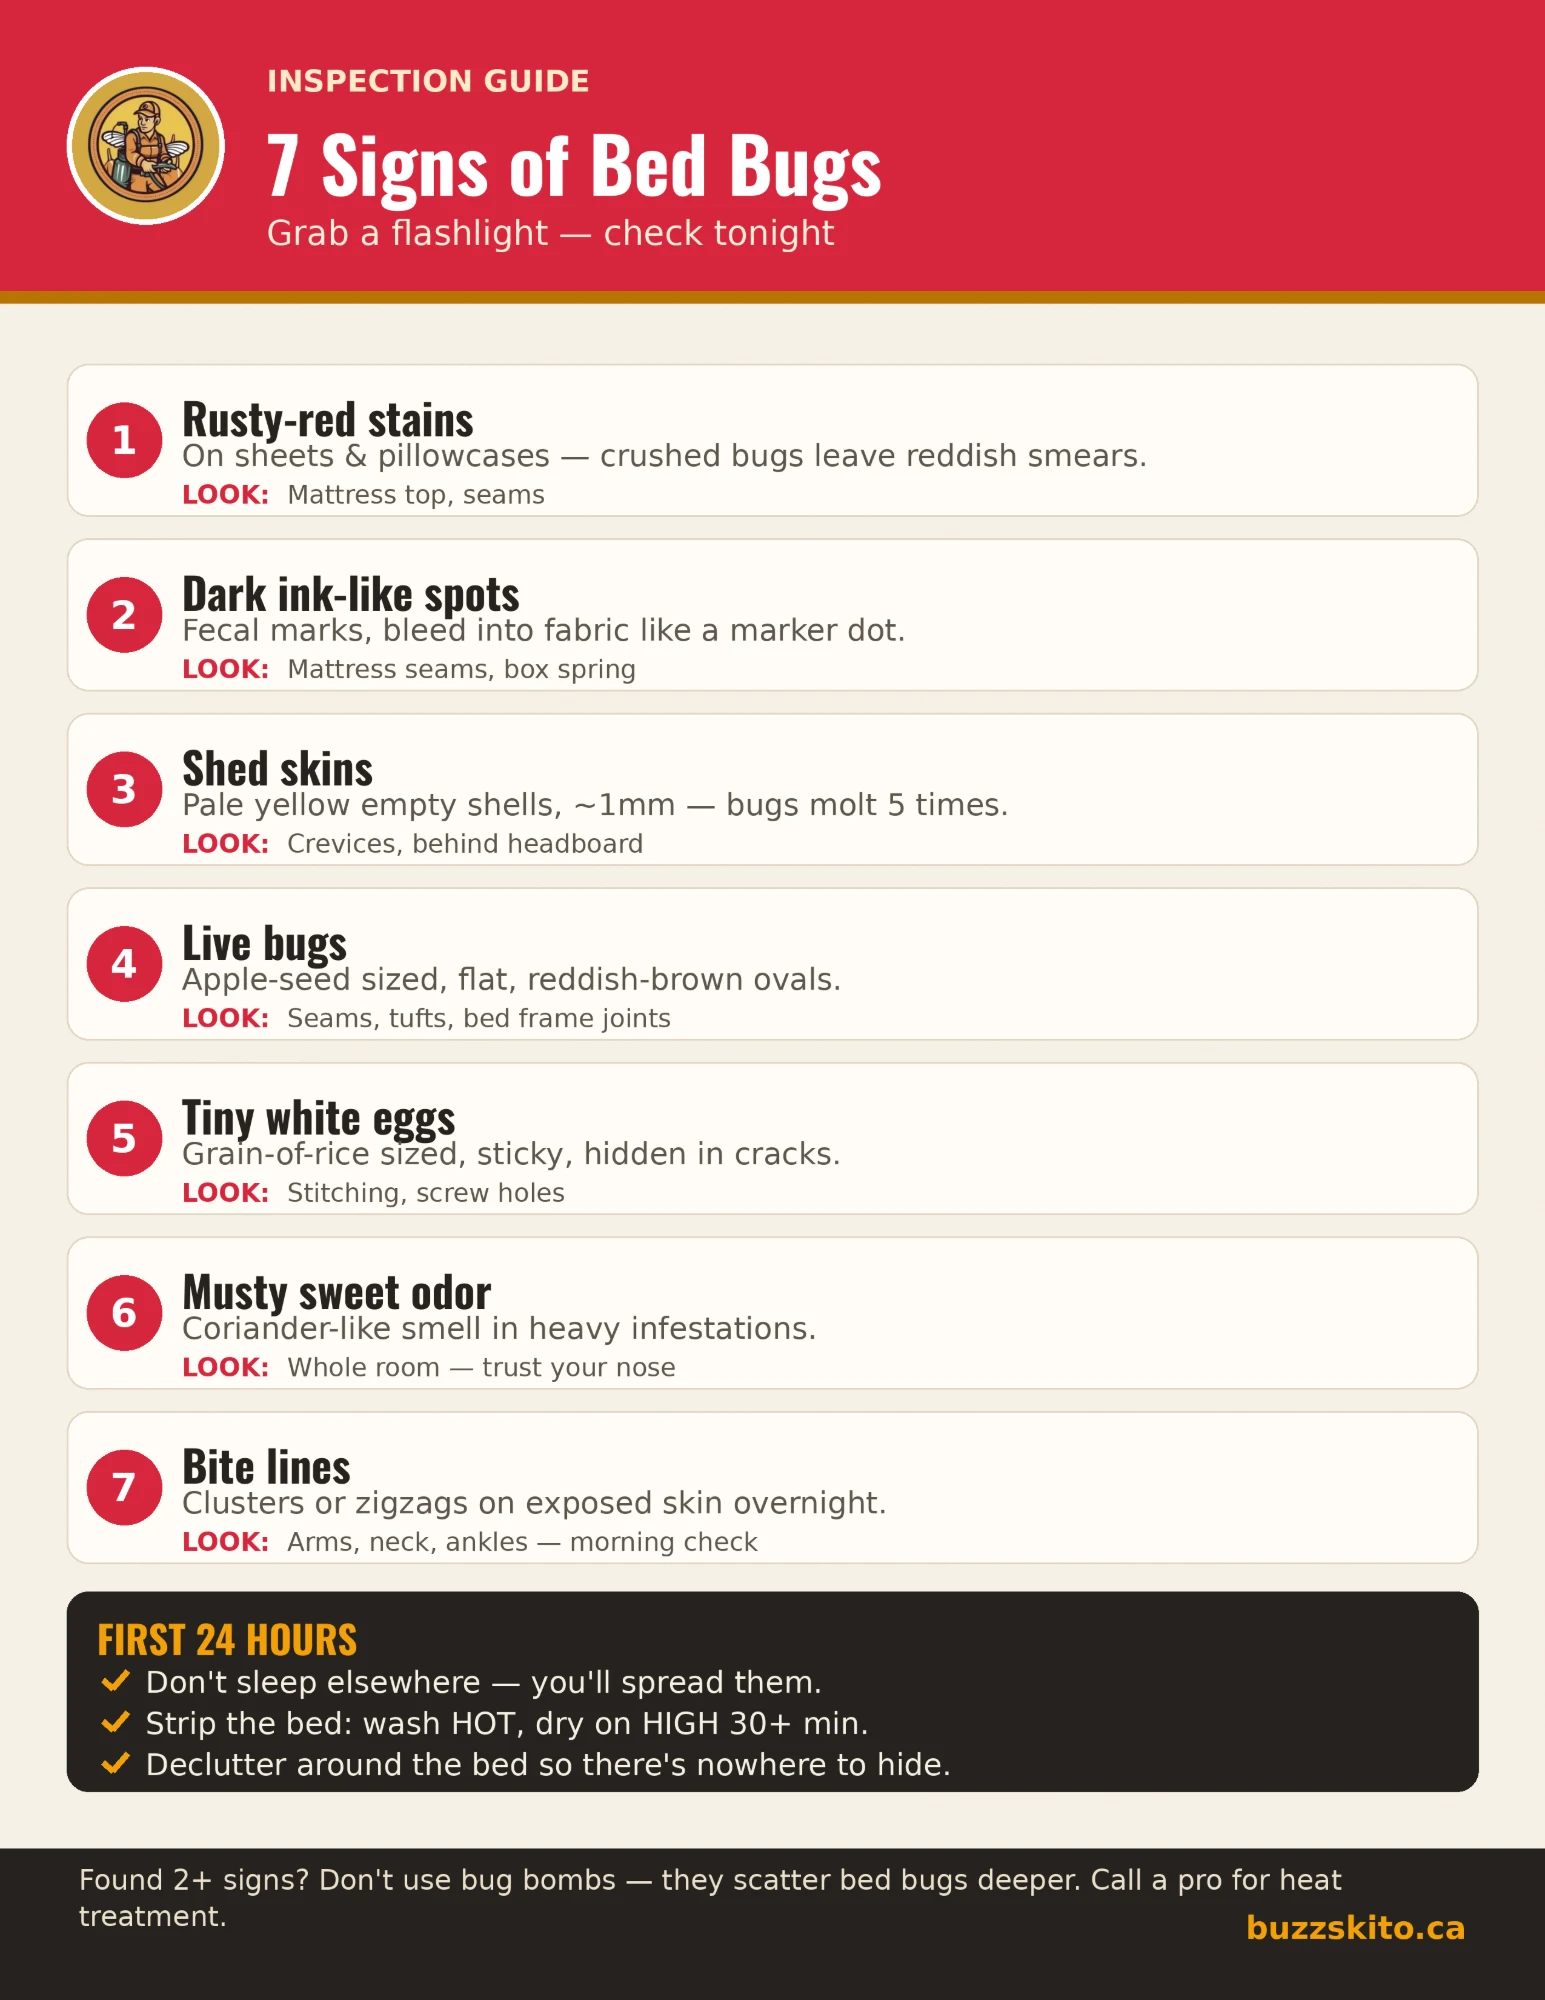 Signs of Bed Bugs: A 7-Point Checklist to Run TonightThe seven signs of bed bugs, from live bugs and ink-like spots to bites, with where to look tonight, what each is…
- Baby Bed Bugs in Canada — What Nymphs Look Like at Each Stage, and Why Finding One…Baby bed bugs (nymphs) are 1–4.5 mm, translucent, and moult five times. How to tell them from carpet beetle larvae and…
- Best Bed Bug Spray for Travel Canada 2026 — Carry-On-Legal Luggage & Hotel PicksThe best carry-on-legal bed-bug sprays for travel in Canada: TSA/CATSA 100 mL rules, PMRA-registered picks like Doktor…