
BuzzSkito Mosquito & Tick Control Specialists · Published July 21, 2026
Yes, You Can Get Rid of Bed Bugs Yourself — With a System, Not a Spray
The single most useful thing to understand before you spend a dollar is this: bed bugs are not beaten by a product, they are beaten by a protocol. Nearly every failed DIY story follows the same arc — someone buys a spray, hits the mattress, sees fewer bugs for a week, declares victory, and then watches the infestation roar back as a fresh wave of eggs hatches. The bugs were never gone; they were hiding in the box spring, the baseboard crack, and the headboard screw holes, and their eggs sat immune to the chemistry the whole time. It is worth knowing what that dollar is being measured against: the pro-versus-DIY cost comparison prices a full protocol next to a professional quote so you can tell which side of the line your infestation sits on.
A protocol wins because it attacks the infestation from five directions at once and keeps the pressure on for as long as the life cycle demands. You physically remove what you can reach, kill what you can touch with heat, poison the travel routes with a residual dust, lock down the bed with encasements, and measure the whole campaign with interceptor traps. For a contained, single-home infestation caught reasonably early, this genuinely works — and it costs a fraction of what a professional charges, with most of the money going into reusable equipment you keep. What it demands in return is discipline: weeks of repeated, patient work rather than one dramatic afternoon.
Check current Canadian availability of the core basket:
Step 1 — Confirm and Contain Before You Treat
Do not start spraying or steaming until you have actually confirmed bed bugs and mapped where they are. Look for live bugs and their signs in the classic harbourage: the seams and piping of the mattress, the corners and underside fabric of the box spring, the joints and screw holes of the frame, behind the headboard, and along the seam where carpet meets baseboard. Tell-tale evidence is rusty or dark spotting (digested blood), pale shed skins, and tiny pale eggs in the crevices. Our guide on how to check for bed bugs walks through a full room inspection, and if you want certainty a bed-bug detector or monitor can confirm activity before you commit.
Then contain. The most damaging mistake at this stage is to abandon the bed and start sleeping on the couch — the bugs will simply follow you and seed a second infestation in the living room. Instead you will make the treated bed into an island (encasements on, interceptors under the legs, frame pulled a few inches off the wall). Bag up infested linens and clothing in sealed plastic and hold them for a hot dryer cycle. Resist the urge to move mattresses or upholstered furniture into another room “to get them out of the way” — that just relocates the problem.
Step 2 — Steam and Vacuum: The First-Day Knockdown
Your first treatment pass is mechanical and thermal, and it delivers the biggest single drop in the population. Start with the dry-vapour steamer. Move it slowly — a few centimetres per second — over every mattress seam and tuft, the box-spring edges and underside, all frame joints and screw holes, the headboard cracks, and the baseboards nearest the bed. Heat is the one weapon bed bugs cannot develop resistance to, and it kills the eggs that sprays and suction cannot touch. The slow pass is non-negotiable: rushing lets the surface cool before the heat penetrates into the crevice where the bugs actually are.
Immediately follow with the sealed-HEPA vacuum and its crevice tool. Press the nozzle firmly into the same seams and edges, dragging the hard edge along the piping to dislodge bugs that grip the fabric, and work the whole room perimeter where wall meets floor. A sealed body matters here so that the fine debris and allergen you disturb does not blow straight back into the room. The instant the pass is done, remove the bag or bin contents, seal it inside a second plastic bag, and put it in an outdoor bin — bed bugs survive inside a vacuum and will crawl back out if you leave them there.
Step 3 — Apply the Desiccant Dust to Every Void
Steam and suction are powerful but temporary; they do nothing the moment you stop. The desiccant dust is what keeps killing for weeks after. A silica-gel dust is the modern first choice because it clings tightly to insect cuticle and kills faster; food-grade diatomaceous earth is a cheaper, widely available alternative that works on the same physical principle of abrading and drying out the shell. Both share one make-or-break rule: apply the thinnest possible film. A visible pile is something a bed bug walks around; a barely-there dusting is a minefield it must cross.
Use a small hand duster to puff a light film into the places bugs travel and hide but where you will not be steaming daily: cracks in the frame and headboard, the void behind baseboards and quarter-round, inside the box-spring fabric, into electrical outlets and switch plates (power off), under the carpet edge, and along wall-floor junctions. Keep it out of open surfaces you touch and away from where anyone would inhale it, and keep it dry — damp desiccant clumps and stops working. Left undisturbed, this residual layer will keep killing the nymphs that hatch over the following weeks.
Step 4 — Encase the Mattress and Box Spring
Once the bed has been steamed, seal the mattress and the box spring inside certified bed-bug encasements. This does three jobs at once: it traps any bug or egg still inside so it dies without a blood meal, it blocks new bugs from getting into the mattress at all, and it turns the whole surface into smooth, zippered fabric with no seams to hide in — which makes every future inspection trivial. This is the reason you almost never need to throw a mattress away; disposal is expensive, spreads bugs through the building as you carry it out, and leaves the frame and room untreated to re-infest whatever you buy next. Choose a genuinely certified encasement with a sturdy zipper, and leave it zipped on for at least a year — longer than a bed bug can survive without feeding.
Step 5 — Ring the Legs With Interceptor Traps
Place an interceptor trap under every leg of the bed and any upholstered furniture you still use. These shallow cups catch bugs trying to climb up to feed or back down to harbourage, which physically protects the sleeper, but their real value is intelligence. Once the frame is pulled away from the wall and no bedding touches the floor, the only route to you runs through the cups — so the count you find each morning is a direct readout of the campaign. Steady or falling counts mean you are winning; a sudden rise means you missed a harbourage and need to re-steam and re-dust that area. You cannot manage what you do not measure, and interceptors are how you measure a bed-bug fight.
Where a Spray Fits — and Where It Doesn’t
Notice that a spray has not appeared as a headline step. That is deliberate. A labelled contact-and-residual bed-bug spray has a legitimate supporting role for spot-treating specific harbourage you cannot easily steam, but it is a bit player, not the star. Most consumer sprays only kill on direct contact, leave little lasting residual, and do nothing to the eggs; some pyrethroid formulas actually repel bed bugs and scatter them deeper into the structure, making the problem harder to corner. If you use one, treat it as a targeted supplement inside the full protocol, and in Canada use only products bearing a PMRA registration number, applied exactly as the label directs. Skip the grey-market US “bed bug killers” sold online that carry no Canadian registration — they are not legal for use here and their claims are unverified. Our honest look at whether bed-bug sprays actually work covers the limits in detail.
How Long DIY Takes — and Why You Cannot Stop Early
Set your expectations at six to eight weeks of active work, sometimes more for a heavier infestation. The timeline is dictated by biology, not effort: bed-bug eggs hatch in roughly six to ten days and are largely immune to sprays, so even a flawless first treatment leaves a wave of nymphs that will emerge over the following one to two weeks. You break the cycle by repeating the steam-and-vacuum pass every few days, letting the residual dust work continuously, and watching the interceptor counts trend down. The infestation is only cleared when the traps stay empty for two to three consecutive weeks with no fresh bites — not at the first week of relief. Stopping early is, without exaggeration, the number-one reason home treatments fail. For the broader strategy across an entire home, our complete bed-bug removal guide and the DIY heat-treatment walkthrough go deeper on scheduling the repeat passes.
How to Choose Your Kit: Where to Spend and Where to Save
This is a mid-ticket basket, and the smart money is not spread evenly. Prioritise like this:
- Spend on the steamer (the engine). A steamer that produces genuine dry, hot vapour and holds temperature through a long session is the difference between killing eggs and merely warming fabric. This is the tool that most rewards quality — see our steamer comparison.
- Spend on certified encasements (no cheap zippers). A bargain encasement that splits at the seam or tears at the zipper defeats the entire purpose. Buy genuinely certified covers with reinforced zips.
- The dust is cheap — buy enough to cover the room. Desiccant dust costs little per gram, so there is no reason to ration it. A single container treats a whole bedroom’s cracks and voids many times over.
- Interceptors scale with your beds and sofas. Buy a cup for every leg of every piece of furniture you sleep or sit on. They are inexpensive and their monitoring value is enormous.
- The vacuum can be one you already own — if it is sealed. If you own a good sealed-HEPA machine, use it and save the money. If yours is a leaky bagless unit, either empty it outdoors into a sealed bag every time or add a proper sealed-HEPA machine.
For treatable items that cannot be steamed — shoes, books, electronics, luggage — a whole-room heater or a smaller heating chamber extends the same on-contact heat kill to objects, and for travellers a luggage heater keeps you from bringing bugs home in the first place. These are optional add-ons, not core basket items, but they close common re-infestation routes.
When to Stop DIY and Call a Professional
DIY is genuinely effective for a contained, single-home infestation — and a poor fit for some situations, where trying to go it alone just wastes weeks. Escalate to a professional if the infestation is spread across multiple rooms, if you live in an apartment or condo where shared walls let bugs travel between units and your neighbours keep re-seeding you, if you have run the full protocol diligently for eight weeks and interceptor counts refuse to fall, or if a vulnerable person’s health is at stake. Multi-unit buildings in particular are very hard to clear from one apartment alone and usually need building-wide coordination. There is no failure in escalating — it is simply matching the tool to the size of the problem. For the full decision framework and the rest of the bed-bug cluster, start at our bed-bug control hub.
Frequently Asked Questions
Can you really get rid of bed bugs yourself in Canada?+
Yes — a determined homeowner can clear a small-to-moderate bed-bug infestation without a professional, but only by running a full protocol rather than reaching for a single spray. The DIY approach that actually works is a coordinated basket: physically remove bugs with a steamer and a sealed-HEPA vacuum, kill hidden survivors and eggs with heat, apply a long-lasting desiccant dust (like a silica product) into cracks and voids, seal your mattress and box spring inside certified encasements, and mount interceptor traps under every bed and sofa leg to monitor progress. No one tool does it alone. Where DIY fails is almost always because someone sprayed once, saw fewer bugs for a week, and stopped — bed bugs rebound from eggs and deep harbourage. Sustained, layered treatment over six to eight weeks is what wins.
What is the fastest way to get rid of bed bugs on your own?+
The fastest DIY knockdown is heat plus mechanical removal on day one: steam every seam, tuft, and crack of the bed, box spring, headboard, and nearby baseboards, then immediately vacuum the whole perimeter with a sealed-HEPA machine and seal the bag outside. Heat kills on contact — bugs and eggs — where suction cannot reach glued eggs. Follow the same day by encasing the mattress and box spring and placing interceptor traps under every leg. That single coordinated pass drops the visible population dramatically. But "fast" and "finished" are different things: eggs keep hatching for one to two weeks, so you must repeat the steam-and-vacuum cycle and let the residual desiccant dust work for weeks before you can call it done.
What products do I need for a DIY bed bug treatment?+
A complete Canadian DIY basket has five roles: (1) a dry-vapour steamer to kill bugs and eggs with heat on contact; (2) a sealed-HEPA vacuum to physically strip live bugs, shed skins, and debris from seams and edges; (3) a desiccant dust — a silica-based product is the modern choice, with food-grade diatomaceous earth as a cheaper alternative — applied in a fine film into cracks, voids, and under baseboards for weeks of residual kill; (4) certified bed-bug mattress and box-spring encasements to trap anything inside and give you a smooth, inspectable surface; and (5) interceptor traps under every bed and sofa leg to catch travellers and, crucially, tell you whether numbers are dropping. Many people add a labelled contact-and-residual bed-bug spray for spot treatment, but the dust and heat do the heavy lifting.
Does diatomaceous earth work on bed bugs?+
It works, but slowly and only when applied correctly. Diatomaceous earth (DE) is a desiccant — it abrades and dries out the insect's waxy shell so it dehydrates over several days to a couple of weeks. The rules that make or break it: use food-grade DE, apply the thinnest possible film (a visible pile is a bug will walk around it — a barely-there dusting is what they must cross), and keep it dry, since damp DE clumps and stops working. DE is cheap and widely available, but modern silica-gel desiccant dusts generally kill faster and cling better to insect cuticle, which is why many DIYers now prefer them for the primary void treatment and reserve DE for broad, low-traffic areas. Our companion guide on diatomaceous earth for bed bugs covers technique in detail.
How long does it take to get rid of bed bugs yourself?+
Plan on six to eight weeks of active work for a typical DIY clearance, sometimes longer for a heavier infestation. Here is why: bed-bug eggs hatch in roughly six to ten days and are largely immune to sprays, so even a perfect first treatment leaves a wave of nymphs that emerge over the following one to two weeks. You break the cycle by repeating steam-and-vacuum every few days, letting the residual desiccant dust kill anything crossing it, and watching the interceptor traps for a steady decline. Only when the traps stay empty for two to three consecutive weeks — with no new bites — can you consider it cleared. Stopping at the first sign of relief is the single most common reason DIY treatments fail and infestations rebound.
Do I need to throw out my mattress if I have bed bugs?+
Almost never. Throwing out a mattress is expensive, risks spreading bugs through the building as you carry it out, and does nothing about the bugs already in your frame, baseboards, and furniture — they will simply re-infest the new mattress. The far better move is to treat the mattress with steam, then seal it (and the box spring) inside a certified bed-bug encasement. A good encasement traps any bugs and eggs left inside so they die, blocks new ones from getting in, and turns the whole mattress into a smooth surface with no seams for bugs to hide in — which also makes future inspection trivial. Reserve disposal for items that are genuinely destroyed or impossible to treat, and if you must discard something, wrap and label it so no one else takes it home.
Where do bed bugs hide, and where should I focus treatment?+
Bed bugs stay within a few feet of where you sleep, so treatment is concentrated there. The primary harbourage is the bed itself: mattress seams and piping, box-spring corners and the fabric underside, and every joint, screw hole, and crack of the frame and headboard. From there they radiate to the nightstand, the seam where carpet meets baseboard, behind the headboard on the wall, inside electrical outlets and switch plates, under the edge of loose wallpaper, and into any upholstered furniture in the room. A DIY protocol treats all of it: steam and vacuum the bed and soft furnishings, dust the cracks and voids and baseboards, encase the mattress and box spring, and ring the bed legs with interceptors. Missing the secondary harbourage is why treatments that focus only on the mattress keep failing.
Can I just use a bed bug spray from the hardware store?+
A store spray alone will not clear an infestation, and relying on one is the classic DIY mistake. Most consumer sprays only kill bugs they directly contact and leave little or no lasting residual, so they miss the majority of the population hiding in cracks and the eggs that are immune to the chemistry. Worse, some pyrethroid sprays repel bed bugs, scattering them deeper into walls and adjacent rooms and making the problem harder to corner. A labelled contact-and-residual bed-bug spray has a legitimate supporting role for spot-treating specific harbourage, but it belongs inside the full protocol — heat, vacuum, desiccant dust, encasements, and interceptors — not as a standalone fix. In Canada, only use products bearing a PMRA registration number and follow the label exactly.
Is heat or chemicals better for DIY bed bug control?+
For a homeowner, heat is the more reliable killer and chemicals play a supporting residual role — the best DIY plans use both. Heat (from a steamer, or a heat chamber for treatable items) kills bugs and eggs on contact with no resistance to overcome, which is a real advantage since bed bugs have developed resistance to several common insecticide classes. Its limit is that heat only works where you apply it and leaves nothing behind. That is where a residual desiccant dust earns its place: it keeps killing for weeks as bugs travel through treated cracks and voids. So the honest answer is not either/or — steam and heat for immediate on-contact kill of what you can reach, desiccant dust for the lasting residual in the places you cannot steam every day.
How do I keep bed bugs from spreading to other rooms while I treat?+
Contain first, then treat. Do not start sleeping on the couch — that is the fastest way to seed a second infestation, because the bugs will simply follow you to the new sleeping spot. Instead, keep sleeping in the treated bed with encasements on and interceptors under the legs, so the bed becomes an island the bugs cannot easily reach or leave. Bag infested clothing and linens in sealed plastic and run them through a hot dryer cycle before storing them clean in fresh sealed bags. Avoid dragging infested furniture through the home. Vacuum and dispose of the bag outside every session. Never move mattresses or upholstered items to another room "to get them out of the way" — you are just relocating the problem.
When should I stop DIY and call a professional in Canada?+
Call a professional if the infestation is widespread across multiple rooms, if you live in an apartment or condo where units share walls (because bugs travel between units and building-wide coordination is often required), if you have run a full protocol diligently for eight weeks and interceptor counts are not falling, or if the situation is affecting a vulnerable person's health. Multi-unit buildings in particular are very hard to clear from one apartment alone — your neighbours re-seed you. There is no shame in escalating: DIY is genuinely effective for a contained, single-home infestation caught reasonably early, and a poor fit for a building-wide problem. Our guides on clearing bed bugs in an apartment and the broader control hub cover the escalation decision in more depth.
How much does it cost to get rid of bed bugs yourself versus hiring someone?+
A DIY basket — steamer, sealed-HEPA vacuum (if you do not own one), a desiccant dust, two or three encasements, and a set of interceptor traps — typically costs a fraction of a professional treatment, and most of it is reusable equipment you keep. Professional bed-bug jobs are priced per room and per visit and usually require multiple visits, so they run substantially higher. The trade-off is effort and time: DIY demands weeks of disciplined, repeated work, while a professional brings commercial heat equipment and experience. For a contained infestation in a house, DIY is very cost-effective. For a multi-unit building or a large, entrenched problem, the professional route often saves money in the long run by actually finishing the job.
Related Reading
- Bed-Bug Control Canada — The Complete Hub
- How to Get Rid of Bed Bugs in Canada — Full Removal Guide
- Getting Rid of Bed Bugs in an Apartment
- DIY Bed-Bug Heat Treatment — How to Do It Safely
- How to Kill Bed-Bug Eggs
- Best Bed-Bug Steamer Canada
- CimeXa Silica Dust Review
- Bed-Bug Mattress Encasements
- Bed-Bug Interceptor Traps
- Best Pest-Control Equipment Canada — The Device Hub
Keep reading
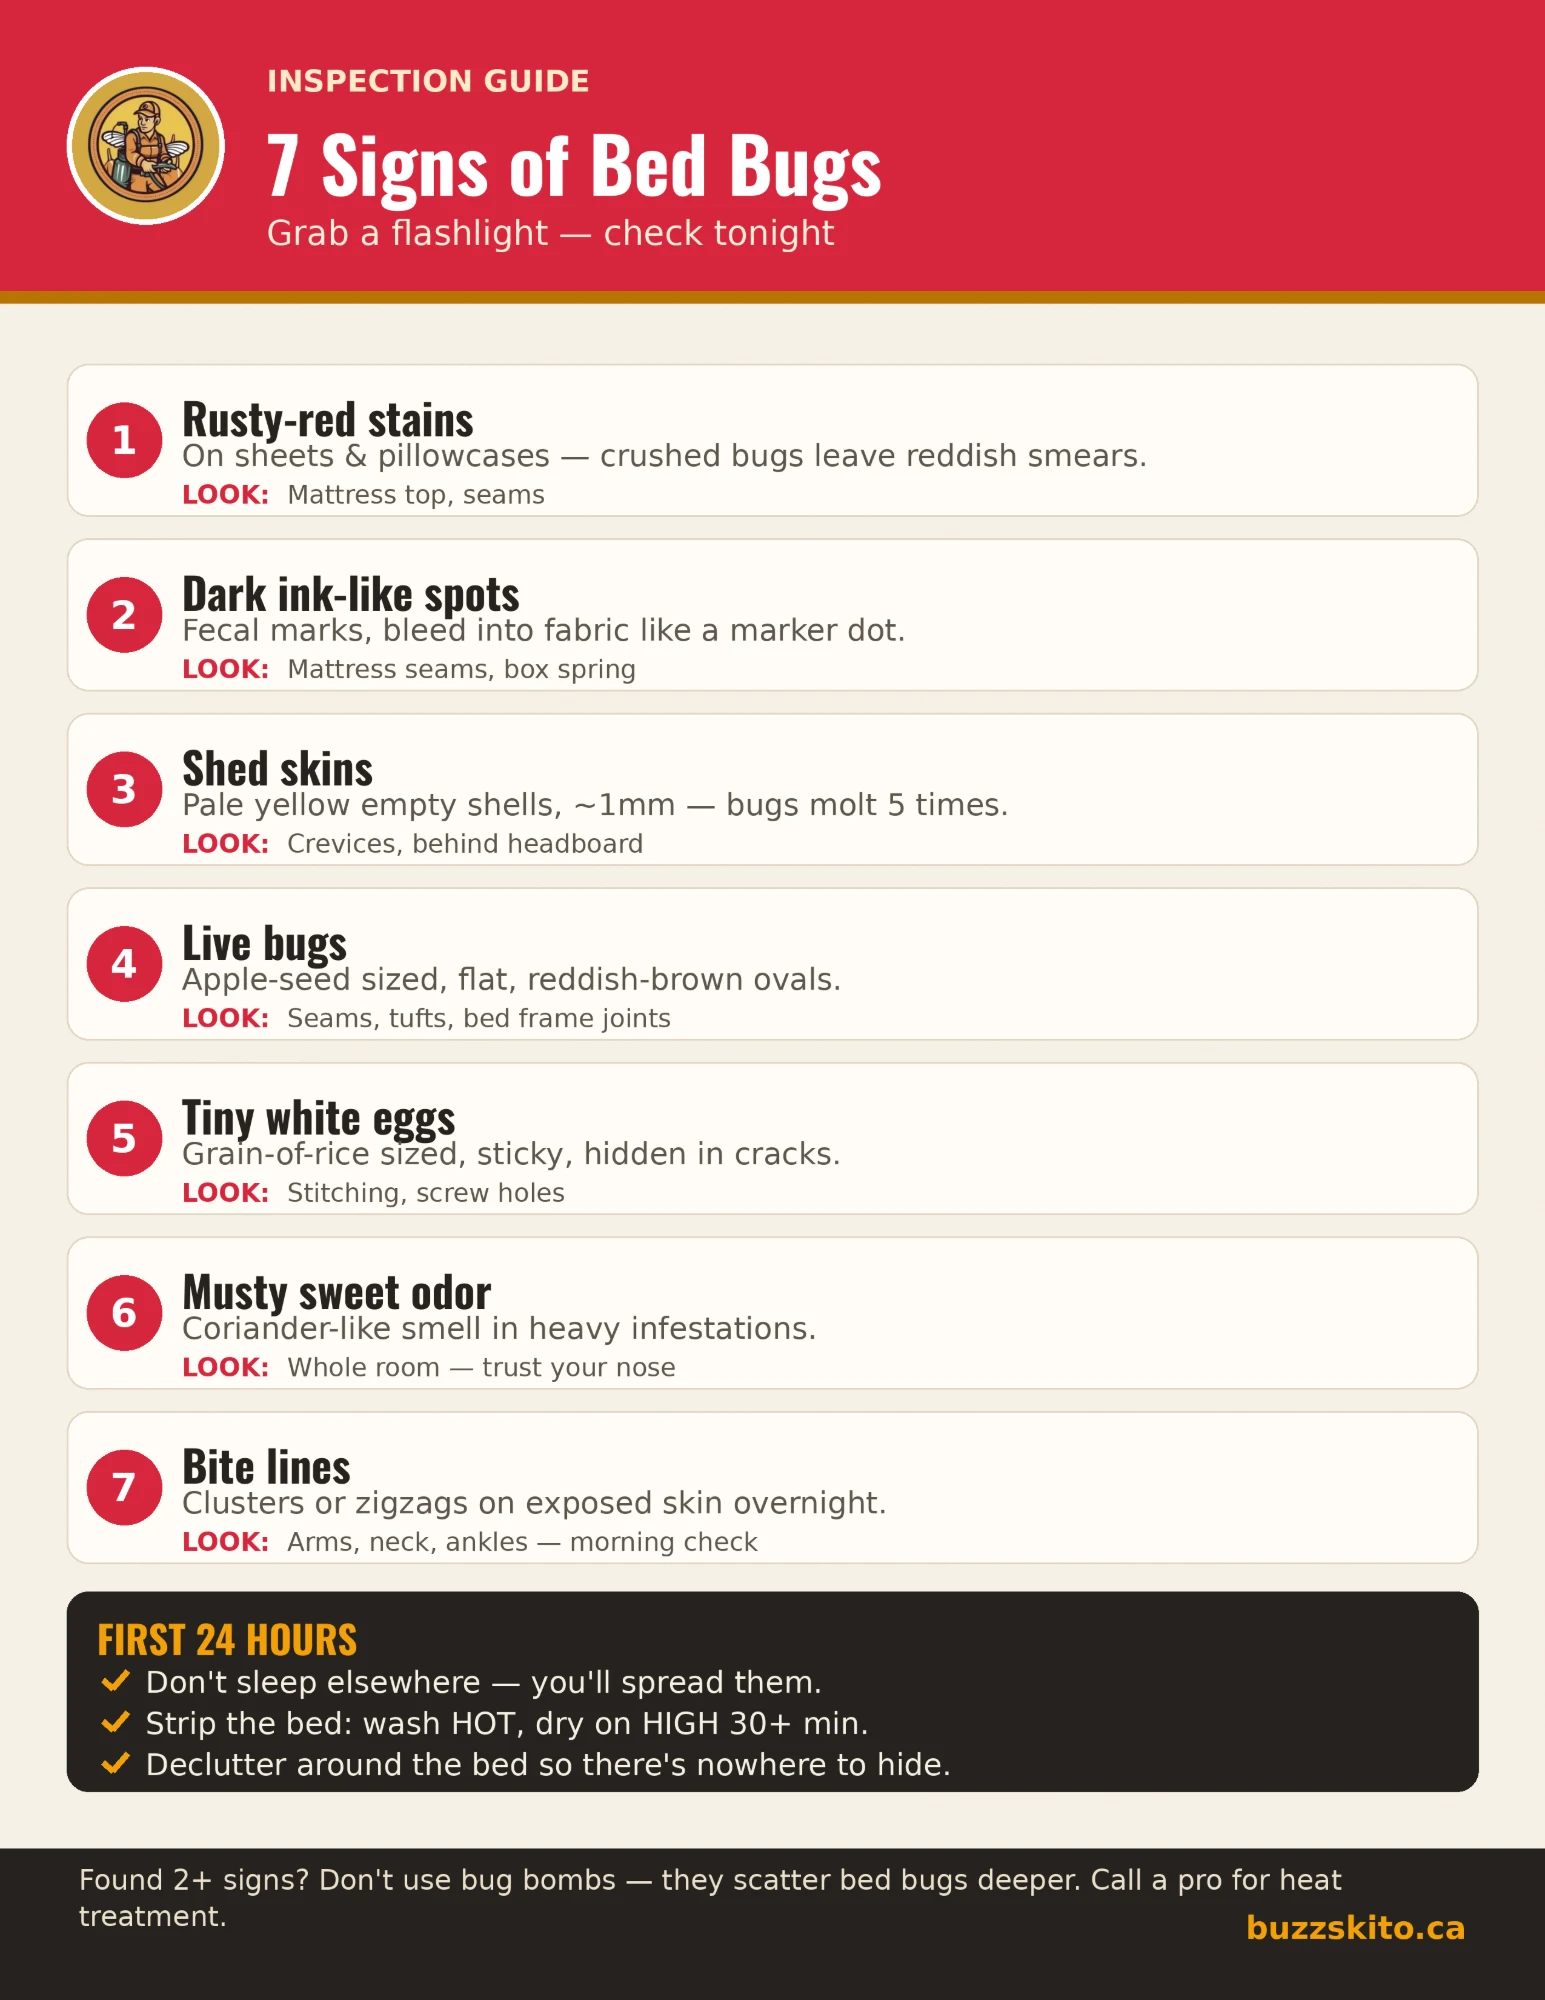 Signs of Bed Bugs: A 7-Point Checklist to Run TonightThe seven signs of bed bugs, from live bugs and ink-like spots to bites, with where to look tonight, what each is…
- Best Sealed-HEPA Vacuum for Bed Bugs & Fleas Canada 2026 — Canister vs Stick vs HandheldSealed-HEPA vacuums for bed-bug and flea remediation: why a sealed body and bagged disposal matter, crevice-tool…
- How to Kill Bed Bug Eggs in Canada 2026 — Why Heat Wins and Sprays MissHow to kill bed-bug eggs in Canada: why contact sprays miss the eggs, the temperature that kills them, and the steam +…