
BuzzSkito Mosquito & Tick Control Specialists · Published July 21, 2026
Why an Apartment Is a Different Fight
Getting rid of bed bugs in an apartment is not the same problem as getting rid of them in a house, and the guides that treat it as the same set you up to fail. Three things change the moment you are a renter. First, you share walls, and bed bugs travel through wall voids, outlet boxes, plumbing runs, and baseboard gaps — so even a perfectly cleared unit can be re-seeded by an untreated neighbour. Second, you cannot do the single most reliable eradication method, whole-room heat treatment, because it needs commercial equipment and access you do not have. Third, and most importantly, in most Canadian provinces the professional extermination is not your bill to pay — it is your landlord’s legal responsibility. Renters also tend to blame the wrong vector: for Toronto tenants who commute, how much risk transit really carries is worth reading before replacing a mattress that did not need replacing.
That reality shapes the whole plan. Your job as a tenant is not to eradicate the building — it is to contain your unit, monitor honestly, and force the process forward with the landlord. The products below do exactly that: they stop the bites tonight, tell you whether the problem is shrinking or being refilled from next door, and prepare your unit so any professional treatment actually lands. For the general (non-apartment) walkthrough, see our full guide to getting rid of bed bugs in Canada; if you own your place and want the room-by-room DIY protocol, our DIY bed-bug guide goes deeper on self-treatment.
Check current Canadian availability of the four kit layers:
Step 1 — Report It in Writing the Same Day (and Know Your Rights)
Before you buy a single product, send your landlord or property manager a written notice — email is ideal because it timestamps itself — stating that you have found bed bugs and requesting professional treatment. This is not a formality; it is the step that protects you and starts the clock. In most Canadian provinces the landlord is legally required to keep the unit fit for habitation and to arrange and pay for pest extermination, and in a multi-unit building bed bugs are treated as a building-wide issue rather than a tenant’s housekeeping problem. Ontario’s Residential Tenancies Act, for instance, places maintenance and remediation squarely on the landlord.
A few rules keep you on solid ground: report promptly and in writing, keep copies of everything, provide reasonable access for inspection and treatment, and prepare your unit as instructed. Do not withhold rent, and do not quietly hire your own exterminator without written notice — both can backfire. If the landlord does not act within a reasonable time, escalate to your provincial residential tenancy board or your local public-health unit, which in many municipalities can order a building to treat. Your containment kit runs in parallel with all of this — it does not replace the report.
Step 2 — Make the Bed an Island (Same Night)
The fastest way to stop getting bitten is to isolate where you sleep, and two products do it together. Fit zippered mattress and box-spring encasements — certified bed-bug covers that seal every seam — so that any bugs and eggs already inside are trapped, starve, and can never bite through the fabric, while the smooth exterior gives new bugs nowhere to hide and makes inspection trivial. Then place a bed-bug interceptor trap under each of the four bed legs. Bed bugs cannot fly or jump; to reach you they climb the legs, and the smooth-walled outer cup of an interceptor stops them and holds them.
For the island to work, the bed cannot touch anything else. Pull it away from the wall, make sure no blankets, bed skirts, or charging cords drape to the floor, and keep it that way. Do this and bites usually drop sharply within a night or two. One hard rule: do not decamp to the couch or a spare room. It feels like relief, but all you do is give the bed bugs a fresh host in a new harbourage and hand yourself a second infestation to clear. Stay in your encased, intercepted bed. Our deep dives on interceptor traps and mattress encasements cover placement and what separates a good cover from one that tears at the zipper.
Step 3 — Lay Down a Long-Term Barrier With Desiccant Dust
Encasements and interceptors protect the bed; a desiccant dust attacks the harbourage. Silica-gel dust such as CimeXa kills mechanically: its microscopic particles abrade and dry out the waxy layer that keeps a bed bug from dehydrating, so the insect dies of water loss. Because the action is physical rather than chemical, bed bugs cannot evolve resistance to it the way they have to many spray chemistries — and a thin film keeps working for months as long as it stays dry. That combination of long residual and no resistance is why desiccants are one of the most valued tools in a professional’s kit.
Technique is everything. Apply a barely visible film — a thick, visible pile of dust actually repels bugs and makes them walk around it, the opposite of what you want — into the cracks and voids bed bugs travel through: bed-frame joints, baseboard gaps, the edges of carpet, behind loose wallpaper, and, with the power off at the breaker, into outlet and switch plates, which are a favourite highway between apartment units. Keep it out of open sleeping and living surfaces. If you prefer the cheaper, more widely stocked option, food-grade diatomaceous earth works on the same drying principle — our guide to diatomaceous earth for bed bugs and our dedicated CimeXa review compare the two and walk through the thin-film application.
Step 4 — Use Spray as a Support Layer, Not the Plan
Sprays are the tool most renters reach for first and lean on hardest, and that instinct is exactly backwards. A contact spray kills the bed bugs it directly wets, which makes it genuinely useful for knocking down bugs you can see, but it does nothing to the eggs and the bugs tucked deep in seams, joints, and wall voids — and that hidden population is most of the infestation. On top of that, many over-the-counter pyrethroid sprays run into the widespread insecticide resistance that modern bed-bug populations carry, so a spray-only campaign usually just thins the visible bugs while the real population regroups.
Used correctly, a Health-Canada-registered spray is a fine supporting layer: treat reachable, labelled surfaces, follow the directions exactly, and never apply a product to a mattress surface unless the label specifically allows it. Check for the PCP registration number that every legal pesticide sold in Canada must display, and skip US-only grey-market concentrates ordered across the border — they are not registered for Canadian use, and stronger is not the answer here anyway. If you want the honest verdict on how far sprays can and cannot take you, our piece on whether bed-bug sprays actually work lays it out, and our bed-bug spray guide for Canada covers what is registered and worth using.
Step 5 — Cut the Traffic Between Units
In a house you fight one population; in an apartment you fight one population plus a steady trickle of reinforcements from adjoining units. You cannot legally treat next door, but you can make your unit a harder place to enter and leave. Seal the obvious highways: dust and, where appropriate, caulk the gaps around outlet and switch boxes, around pipe and radiator penetrations, along loose baseboards, and under the door. Be cautious around shared laundry — transport clothes in sealed bags, wash hot, dry hot, and fold at home, not on a shared table. And never bring secondhand furniture in from a curb or a building common area during an infestation; that is how a cleared unit gets re-seeded overnight.
This is also the argument for pushing your landlord to treat neighbouring units, not just yours. A treatment that clears your apartment while the unit next door stays infested is a treatment with a countdown timer on it. The written report and the tenant-board escalation route from Step 1 exist precisely to get the building treated, which is the only thing that permanently stops the reintroduction pressure.
How to Choose: Sizing and Spending on an Apartment Kit
Because a full renter kit is a real (if mid-range) outlay, it is worth being deliberate about where the money goes and how much of each item you actually need. Buy in this priority order:
- Interceptors — one per leg, count your legs. A bed has four; add every sofa, chair, and nightstand you sit or sleep near. A one-bedroom apartment commonly needs eight to sixteen cups. Buy the multi-pack; running out means a blind spot. This is the cheapest, highest-information layer — never skip it to save a few dollars.
- Encasements — mattress and box spring, sized correctly. Both pieces harbour bugs, so encase both, and match the depth of your mattress or the cover will not zip properly. A bed-bug-certified cover with a tight zipper is worth paying a little more for; a cheap dust-mite cover with a loose zip is not a bed-bug barrier.
- Desiccant dust — one container goes a long way. Because you apply a whisper-thin film, a single container of silica dust treats an entire apartment’s cracks and voids many times over. This is the best dollar-for-dollar residual in the kit. Spend the extra on a proper puffer applicator — it is the difference between a thin film and a repellent pile.
- Spray — the smallest slice of the budget. Because it is a support layer with real limits, do not over-invest here. One registered product for spot-treating reachable surfaces is plenty; the money is better spent on the three layers above.
- Sealed-HEPA vacuum — use what you can, buy only if needed. Vacuuming physically removes bugs and debris before you treat, and a sealed-HEPA machine stops what you capture from blowing back into the room. If you are buying, our sealed-HEPA vacuum guide covers what actually matters.
Read that as a spending map: put your dollars into interceptors, encasements, and dust — the layers that monitor, seal, and hold a residual — and treat spray and gadgets as minor add-ons. The most expensive mistake a renter makes is not underspending on products; it is overspending on a new mattress that gets colonised within days, when a $40 encasement would have saved the old one.
Preparing for the Exterminator (and What Not to Do)
When the landlord’s professional treatment is booked, how well you prep your unit largely decides whether it works. Follow the technician’s prep sheet exactly, but the essentials are consistent: launder all bedding, clothing, and soft items hot and dry on high, then keep them sealed in bags until after treatment; declutter aggressively, because clutter is the number-one obstacle to a successful treatment and every hiding spot you remove is one the technician does not have to chase; pull furniture slightly off the walls; vacuum thoroughly with a sealed-HEPA machine and bin the bag outside immediately; and leave your encasements on.
Two things not to do. Do not blast the unit with your own chemical spray right before the professional arrives — it can scatter bugs into new hiding spots and interfere with the method they planned. And do not throw out furniture or your mattress on your own initiative; ask the technician first, because sealing usually beats discarding and a piece dragged through the hallways can seed the whole building. When in doubt, ask what they want moved and what they want left exactly where it is. If you are weighing what professional treatment costs in Canada — useful context even when the landlord is paying — our Canadian pest control cost guide breaks it down.
Don’t Stop Too Early — Read the Interceptors
The most common reason an apartment infestation comes back is that the tenant declares victory the moment the bites ease. Bed-bug eggs keep hatching for a couple of weeks after the adults are gone, which is why even a good professional treatment usually schedules a follow-up two to three weeks later, and why the reintroduction risk from neighbours can stretch the timeline into a couple of months. Your interceptor traps are the scoreboard that keeps you honest: leave them under every leg, check them weekly, and only consider the problem beaten after several consecutive weeks of zero new activity past the last treatment. Until that streak is real, keep the encasements on, keep the dust in place, and keep the pressure on the building.
Frequently Asked Questions
How do you get rid of bed bugs in an apartment in Canada?+
In a Canadian apartment you fight bed bugs on two fronts at once: contain your own unit and report the problem to your landlord in writing. The renter’s kit is interceptor traps under every bed and sofa leg (to monitor and to stop bugs climbing up), zippered mattress and box-spring encasements (to seal the biggest harbourage), a PMRA-registered silica desiccant dust like CimeXa in cracks, outlets, and along baseboards (a long-lasting mechanical barrier), and a Health-Canada-registered contact and residual spray for surfaces you can reach. But the structural work — heat treatment, treating shared wall voids, and coordinating neighbouring units — is legally your landlord’s responsibility in most provinces. Do the containment yourself the same week you notice bites; put the extermination request to the landlord in writing the same day.
Is the landlord or the tenant responsible for bed bugs in Canada?+
In most Canadian provinces the landlord is responsible for arranging and paying for professional bed-bug extermination, because they are legally required to keep the unit in a good state of repair and fit for habitation — and in a multi-unit building bed bugs are treated as a building problem, not a housekeeping failure. Ontario’s Residential Tenancies Act, for example, puts maintenance and pest remediation on the landlord. The tenant’s duty is to report promptly in writing, provide reasonable access, and prepare the unit for treatment (laundering, decluttering, moving items as instructed). Do not withhold rent or hire your own exterminator without written notice — report first, keep records, and escalate to your provincial tenant board or public-health unit if the landlord does not act.
What is the fastest way to stop getting bitten while I wait for treatment?+
Encase the mattress and box spring in zippered bed-bug covers and put interceptor traps under all four bed legs, then pull the bed away from the wall and make sure no bedding, skirts, or cords touch the floor. Done together, this turns the bed into an island: bugs already sealed inside the encasement starve and cannot bite you through the fabric, and bugs living elsewhere in the room have to cross an interceptor cup to reach you and get trapped. It will not end the infestation, but it dramatically cuts bites within a night or two while the full plan and any professional treatment catch up. Do not move to the couch or another room — that just spreads the bugs to a new harbourage.
Do bed bug interceptor traps work in an apartment?+
Yes — and they matter more in an apartment than in a house, for two reasons. First, they are the cheapest reliable way to confirm you still have bed bugs (or confirm they are gone) week over week, which you need because a shared building means reintroduction from a neighbouring unit is always possible. Second, they physically block the main travel route: bed bugs climbing up furniture legs to reach a sleeping host fall into the smooth-walled outer cup and cannot climb out. They do not catch bugs that are already up in the mattress — that is what encasements are for — so run interceptors and encasements together, not one or the other.
What is CimeXa and is it legal in Canada?+
CimeXa is a silica-gel (silicon dioxide) desiccant dust: instead of poisoning bed bugs chemically, its microscopic particles abrade and dry out the insect’s waxy outer layer so it dies of dehydration. Because it is mechanical, bed bugs cannot develop resistance to it the way they have to many spray chemistries, and a thin layer stays effective for a long time as long as it stays dry. Silica-based desiccant products are available to Canadian consumers; always buy a version sold for the Canadian market and check the PMRA registration on the label. Apply a barely visible film — a thick pile of dust repels bugs instead of forcing them to crawl through it — into cracks, outlet plates (power off), baseboard gaps, and bed-frame joints.
Should I use diatomaceous earth or CimeXa in an apartment?+
Both are desiccant dusts and both work by drying the insect out, but silica-gel products like CimeXa generally kill faster and cling better in thin layers, while food-grade diatomaceous earth is cheaper and very widely available. For a renter, the practical difference is application: any desiccant only works as a whisper-thin film in the cracks and voids bed bugs travel through, and a heavy visible layer just gets avoided and makes a mess your landlord will not appreciate. Whichever you choose, keep it out of open sleeping and living surfaces, apply into cracks and under baseboards, and pair it with encasements and interceptors. Our companion guide on diatomaceous earth for bed bugs covers the dust technique in detail.
Do bed bug sprays actually get rid of them?+
Contact sprays kill the bed bugs they directly hit and are useful for knocking down bugs you can see, but they do not reach the eggs and hidden bugs deep in seams, wall voids, and furniture joints — which is where most of an infestation lives. Many over-the-counter pyrethroid sprays are also hit by widespread resistance in modern bed-bug populations, so a spray-only approach usually fails. Use a Health-Canada-registered spray as one layer for reachable surfaces, follow the label exactly, and never treat a mattress surface with a product not labelled for it. The dependable renter stack is encasements plus interceptors plus a desiccant dust, with spray as a supporting tool — not the whole plan.
Can I get rid of bed bugs in an apartment myself, or do I need a professional?+
You can and should do the containment layer yourself — encasements, interceptors, dust, laundering, and decluttering all genuinely help and speed up any professional treatment. But a full apartment eradication usually needs a professional, because bed bugs hide in shared wall voids, baseboards, and adjoining units that you cannot legally or safely treat, and heat treatment (the most reliable kill for eggs) needs commercial equipment. In a rental building the professional treatment is normally the landlord’s responsibility to arrange. Think of it as a partnership: your job is to contain and prepare, the pro’s job is to eradicate the structure, and both have to happen or the bugs come back.
How do bed bugs spread between apartments in a building?+
Bed bugs travel between units through wall voids, along plumbing and electrical runs, through baseboard gaps and outlet boxes, and under and around doorways — and they also hitchhike on shared laundry, in hallways, and on secondhand furniture left in common areas. This is why an apartment infestation is a building problem: even if you clear your own unit perfectly, an untreated neighbour can re-seed it. It is also why you should report in writing immediately — the sooner the building treats adjoining units, the sooner the reintroduction pressure stops. Sealing gaps around your outlets, pipes, and baseboards with a desiccant dust and caulk slows the traffic between units.
How do I prepare my apartment for a bed bug exterminator?+
Follow the exterminator’s prep sheet exactly, because a poorly prepped unit can waste the treatment. Generally: launder all bedding, clothing, and soft items on hot and dry on high, then bag them sealed until after treatment; declutter aggressively so the technician can reach harbourage (clutter is the single biggest obstacle to a successful treatment); pull furniture slightly away from walls; vacuum thoroughly with a sealed-HEPA vacuum and bin the bag outside immediately; and leave encasements on. Do not do a heavy chemical spray yourself right before a professional visit — it can scatter the bugs and interfere with their method. When in doubt, ask the technician what they want moved and what they want left in place.
Will throwing out my mattress get rid of bed bugs?+
Usually no — and it can make things worse. Bed bugs live throughout the room, not just in the mattress, so discarding it rarely ends the infestation and a new mattress dragged in through an infested unit gets colonised within days. Worse, an infested mattress carried through hallways can seed the whole building. A far better move is to seal the existing mattress and box spring in a zippered bed-bug encasement: any bugs and eggs inside are trapped and die, you keep sleeping in your own bed, and you save the cost of replacement. Only replace a mattress if it is physically destroyed, and if you do, keep the new one encased from day one.
How long does it take to get rid of bed bugs in an apartment?+
Plan on several weeks to a couple of months, not days. Even a good professional treatment usually needs a follow-up two to three weeks later to catch bugs that hatched from eggs after the first visit, and in a multi-unit building the reintroduction risk from neighbours can stretch the timeline further until adjoining units are treated. Your interceptor traps are the scoreboard: keep them under every leg and check them weekly, and only consider the problem beaten after you have seen zero new activity for several consecutive weeks past the last treatment. Stopping the moment the bites ease is the most common reason apartment infestations come roaring back.
Related Reading
- How to Get Rid of Bed Bugs in Canada — The Full Guide
- How to Get Rid of Bed Bugs Yourself — DIY Protocol
- Bed-Bug Interceptor Traps Canada — Monitor and Protect the Bed
- Bed-Bug Mattress Encasements Canada — Seal the Bed
- CimeXa Bed-Bug Review Canada — The Desiccant Dust That Doesn’t Quit
- Diatomaceous Earth for Bed Bugs — How to Use It
- Bed-Bug Spray Canada — What’s Registered and Worth Using
- Best Sealed-HEPA Vacuum for Bed Bugs & Fleas Canada
- How to Check for Bed Bugs — Signs and Inspection
- Best Pest Control Equipment Canada — The Full Device Hub
Keep reading
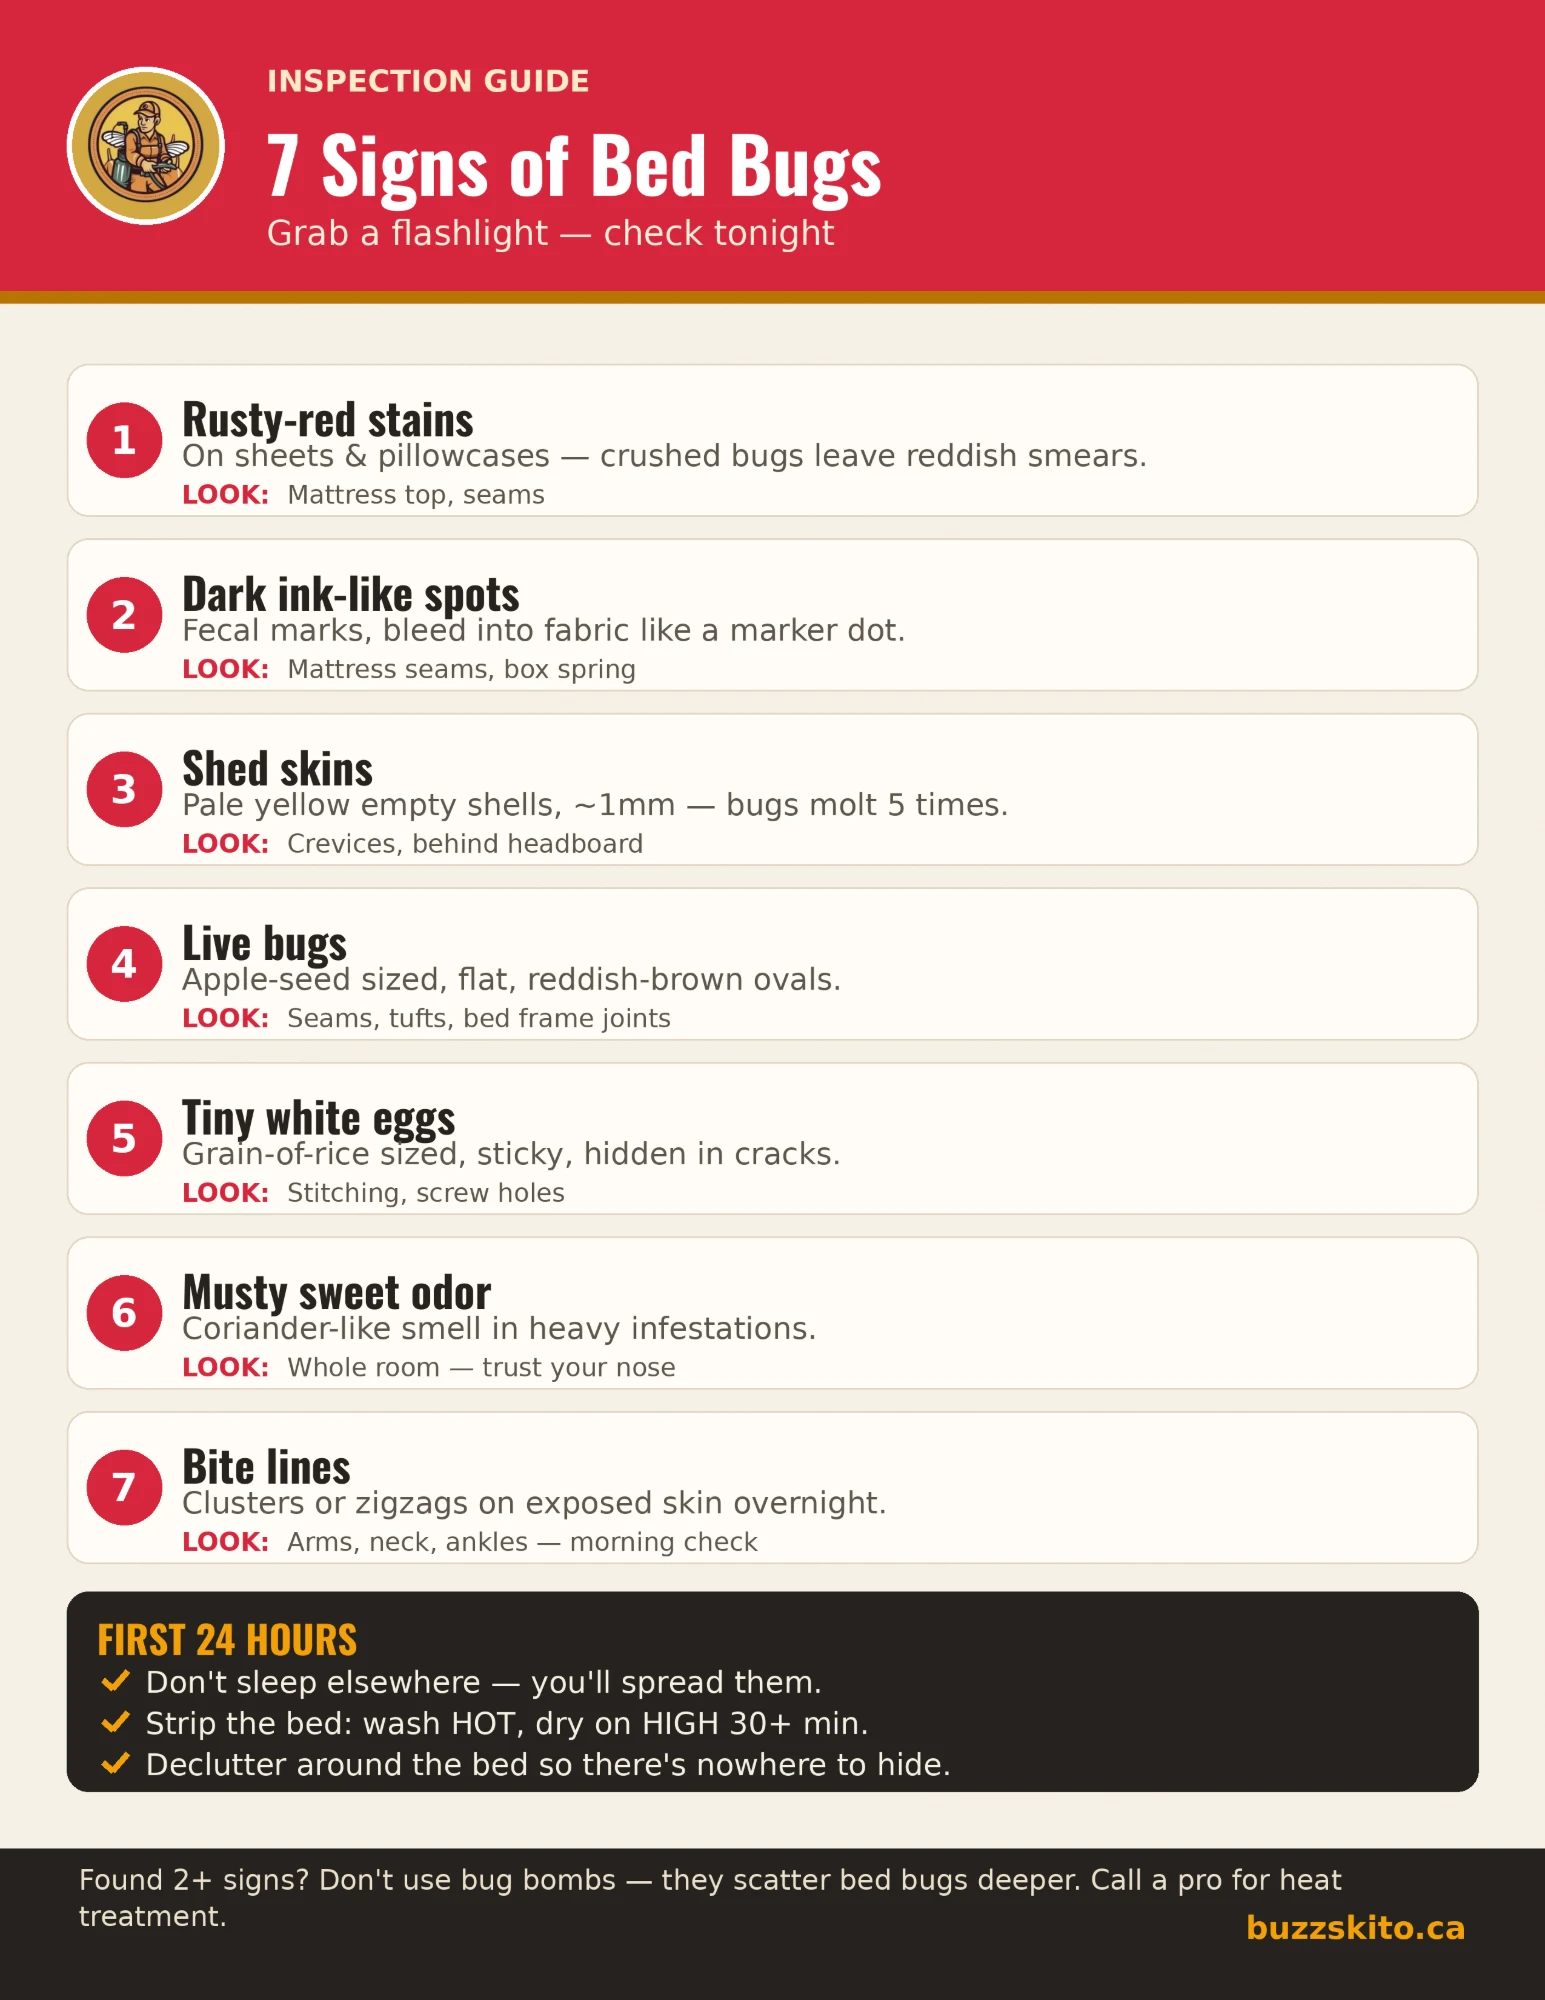 Signs of Bed Bugs: A 7-Point Checklist to Run TonightThe seven signs of bed bugs, from live bugs and ink-like spots to bites, with where to look tonight, what each is…
- Bed Bugs on a Mattress: The Signs and How to Treat the BedDark dots along the seams, rusty smears and pale shed skins are the signs of bed bugs on a mattress. How to vacuum,…
- Doktor Doom Sleep Tight Review Canada 2026 — The PMRA-Registered Mattress Spray, Tested…An independent Canadian review of Doktor Doom Sleep Tight bed bug spray: why its PMRA registration matters, how fast it…