
BuzzSkito Mosquito & Tick Control Specialists · Published July 21, 2026
What Is the Best Rodent Exclusion Kit in Canada?
The best rodent exclusion kit in Canada is not a single product — it is a four-layer system you assemble for less than the cost of one professional visit: copper mesh for gaps, exterior-grade sealant to lock it in, quarter-inch galvanized hardware cloth for openings that must keep breathing, and a chew-resistant seal for the garage door. Everything else on the market — repellent pouches, ultrasonic plugs, “pest-blocker” foam used alone — is either unproven or actively counterproductive, and we will be specific about why.
The logic of exclusion is worth stating plainly, because it inverts how most people fight mice. Trapping removes the mice that got in; exclusion removes the getting-in. A house mouse population compounds fast enough — a female can produce five to ten litters a year — that a house with open entry points is never “done” trapping. Seal the building and one autumn of honest work replaces every future October of catch-and-refill. Pest control professionals are blunt about this among themselves: exclusion is the part of rodent work that actually ends problems. The materials are cheap and none of them require any pesticide registration, which makes this the rare pest project with no regulatory footprint at all.
What makes this a Canadian guide rather than a rewrite of American advice: our freeze-thaw cycles destroy ordinary steel wool in months, our brick-veneer housing stock makes weep holes a first-class entry point that US guides barely mention, and our October indoor-migration window puts a hard deadline on the work that milder climates never enforce.
Check current Canadian availability of the kit components:
The Dime Rule: How Small Is Too Small to Ignore
Start with the fact that makes everyone re-do their first inspection: an adult house mouse passes through any opening the size of a dime, and a juvenile squeezes gaps of roughly 6 mm — the width of a pencil. The limiting factor is the skull; the rest of the animal is soft tissue and follows wherever the skull clears. This is why homeowners who sealed “all the holes” keep catching mice: they sealed the holes that look like holes, and left the ones that look like shadows under the siding.
The rule gives you an objective test. Carry an actual dime on the inspection walk. Anything it could pass through gets metal and sealant — no judgment calls, no “that’s probably fine.” For rats, the benchmark is a quarter, and everything in this guide scales up in gauge: rats gnaw harder, so larger voids get more copper mesh packed more densely, and screening moves to heavier hardware cloth. If your droppings are over a centimetre long or the gnaw marks show distinct tooth grooves, read this guide alongside our rat control guide — the exclusion walk is the same, the spec sheet is not.
Copper Mesh: Why It’s the Featured Pick
Copper mesh is a continuous knitted tube of copper strands, sold in rolls, that you cut to length and stuff into gaps with a screwdriver or fitting tool. Three properties make it the professional default. First, rodents do not chew through it — the strands are hard on teeth and the mesh shifts under gnawing instead of giving a fixed edge to work. Second, it never rusts, which is the whole ballgame outdoors in Canada: ordinary steel wool oxidizes through its strands in one wet season, shrinking inside the cavity, bleeding rust streaks down brick and siding, and finally crumbling out — leaving the hole open again, now with a stain marking it. Third, the knit is springy: packed under compression it grips the cavity walls and resists being pulled out in strands, which mice reliably do to loosely woven material.
Technique matters more than product here. Pack the mesh tight — a loose wad is a nesting material donation, not a barrier. Fill the full depth of the void, not just the visible face. Leave no more than pencil-width daylight anywhere, then cap the plug with exterior sealant so weather, insects, and air leaks are closed off too. Stainless-steel wool sold specifically for pest exclusion (not kitchen scrub grade) is the co-equal alternative — denser to pack, equally chew-proof, equally rust-resistant; choose whichever is better stocked when you order.
The Spray Foam Myth (and Foam’s One Legitimate Job)
The most expensive mistake in DIY exclusion is a can of spray foam used alone. Cured polyurethane foam offers a mouse roughly the resistance of a baguette: rodents gnaw through it in minutes, and field techs will tell you a foamed hole often gets re-opened the first night. Worse, the foam plug hides the hole from you — the exterior looks sealed while the freshly chewed tunnel through the middle of the plug stays invisible until droppings reappear.
Foam has exactly one legitimate role in a rodent job: as a weatherproof carrier over a metal core. The correct sequence is metal first, foam second — stuff the gap with copper mesh or stainless wool, then foam or caulk over it to seal air and moisture. The metal stops the teeth; the foam stops the draft. That air-sealing step is not cosmetic, either: rodents find entry points largely by following plumes of warm, food-scented air leaking out of your building envelope, so an airtight seal makes the remaining structure less attractive to probe in the first place. Products marketed as “pest-blocker” foam vary — some genuinely embed a physical deterrent, many are ordinary foam with a mouse on the label — so read what is actually in the can, and regardless: never foam alone.
Hardware Cloth: For Everything That Must Keep Breathing
A building has openings that exist on purpose — dryer and bathroom exhaust vents, soffit and gable vents, brick weep holes, the gap under a deck — and the answer there is never to seal but to screen. Quarter-inch galvanized hardware cloth is the standard: the largest mesh that reliably stops mice, rigid enough to resist gnawing, and cheap enough to screen every vent on the house from one roll. Cut it with tin snips, oversize each piece a few centimetres past the opening, and fasten with screws and washers into solid material (staples into old wood are an invitation).
Two Canadian specifics deserve their own paragraphs. Weep holes — the open vertical joints spaced along the bottom courses of brick veneer — are drainage and ventilation for the wall cavity, and caulking them solid is a moisture-damage mistake that costs far more than mice do. Use purpose-made stainless or plastic weep-hole covers, or insert a small rolled piece of copper mesh or hardware cloth into each hole: air and water pass, mice do not. Do every accessible hole, not just the ones near the corner where you saw activity — mice patrol the entire wall base at night.
Dryer vents are the other trap for the well-intentioned. Screening the interior of a dryer duct clogs with lint and becomes a fire risk; the correct approach is a vent cover or guard that cages the outside of the hood while the flap keeps working, or a hardware-cloth surround that blocks the gap around the duct where it passes through the wall — usually the real entry point anyway, since the duct hole is almost always cut oversize and never sealed.
Sealant and the Garage Door: The Two Finishing Layers
The sealant’s job is to be the weatherproof lock, not the barrier — teeth beat any caulk ever made. Spend up on an exterior-grade polyurethane or hybrid-polymer sealant rated for masonry and for real cold: cheap interior latex shrinks as it cures, cracks in the first freeze-thaw cycle, and peels off brick in sheets. Use it two ways: capping every mesh plug flush with the surface, and closing the hairline gaps — under 6 mm — that are too small to stuff but still leak the warm air that draws rodents to investigate. A full perimeter on a typical detached house runs through several tubes; buy them all at once so colour and cure behaviour match.
Then walk to the garage, because if your garage is attached, it is statistically your front line. The failure point is nearly always the door’s bottom seal — specifically the two corners, where the rubber astragal meets the vertical track weatherstripping and almost never closes tight, and any spot where the concrete under the seal has chipped. Standard rubber is also chewable, and one motivated mouse turns a corner gap into a doorway overnight. The fix is a rodent-resistant garage-door bottom seal or corner-guard product built with chew-resistant material, plus patching any spalled concrete under the threshold so the seal actually has a flat surface to seal against. Treat the door from garage to house as an exterior door — sweep, weatherstripping, the works — so the garage becomes an airlock instead of a staging area. If mice have been overwintering in vehicles parked in that garage, our guides on keeping mice out of your car and the best rodent deterrents for vehicles pick up that thread.
The 8-Point Exterior Inspection Walk
Materials without an inspection are decoration. Do this walk in daylight, slowly, with a dime in one pocket and chalk or painter’s tape to mark every find. Budget an hour for a typical detached house — crouching, because most entry points live in the bottom 30 cm of the building.
- 1. The sill plate line. Walk the entire foundation-to-siding junction at crouch height. Gaps where wood framing meets concrete are the classic mouse highway, especially at corners and behind shrubs where nobody looks.
- 2. AC lines and utility penetrations. Every pipe, cable, gas line, and conduit that enters the building was installed through an oversized hole, and almost none were sealed with anything a mouse respects. The AC line set — refrigerant lines plus wiring through one generous hole, usually hidden behind a plastic cover — is the single most common miss.
- 3. Dryer and exhaust vents. Check the flap closes fully, the hood is intact, and — the real issue — the gap around the duct where it passes through the wall.
- 4. Weep holes. Every open vertical brick joint along the bottom courses. Screen, never seal.
- 5. Garage-door corners. Close the door and inspect both bottom corners from outside, at ground level, in raking light. Daylight visible means mouse-passable.
- 6. Door thresholds and frames. Exterior doors, side doors, and the basement walkout: worn sweeps, chewed weatherstripping corners, and gaps where the frame meets masonry.
- 7. The roofline. Soffit gaps, unscreened gable and roof vents, and the junction where roof planes meet walls. Mice climb brick and downspouts competently, and deer mice in particular arrive at attic height; a chimney without a cap is an open door.
- 8. Basement windows and window wells. Old steel-frame basement windows with cracked glazing or rotted wood frames, and window wells that collect leaves — cover the wells, repair the frames, screen any vent openings.
Then repair in the same order, metal first, sealant second, and mark each completed point off. The discipline matters: an exclusion job that closes seven of eight points has closed zero of eight, because mice only need the one you skipped.
Why September Is the Deadline (Fall Timing Logic)
Rodent pressure on Canadian homes is not constant — it is a wave, and it breaks in October. Through summer, mice live comfortably outdoors: seed, insects, cover, warmth. As overnight temperatures start holding below roughly 10°C and food sources collapse, mice begin systematically probing structures for heat plumes and openings, and the indoor migration runs hard from early October into November. Every pest company in Ontario sees the same annual call spike; by the time you hear scratching above the kitchen in November, the move-in happened weeks earlier.
The strategic consequence is simple: seal in September, while the building is still empty. September gives you warm, dry days for sealant to cure properly, daylight after work for the inspection walk, materials still in stock (copper mesh and rodent door seals thin out at Canadian retailers by mid-October, exactly on schedule), and — most importantly — a building with nothing inside to seal in. Exclusion done in November, after the wave, risks trapping the problem indoors, which is why late-season jobs must start with a trap line instead. If you are reading this in July or August: you are not early, you are on time to order materials and put the walk on a September weekend. If it is already October or later, run trapping and sealing together — the full sequence is laid out in how to keep mice out of your house this winter, which is the seasonal companion to this kit guide.
The Health Canada Angle: Barriers Need No Registration — Repellent Claims Do
Here is the regulatory context that makes exclusion the frictionless first move. Physical barriers — mesh, hardware cloth, sealant, door seals — are hardware. They are not pest control products under Canadian law, need no registration from Health Canada’s Pest Management Regulatory Agency, carry no label restrictions, and can be installed by anyone, anywhere: rentals, condos, cottages, commercial kitchens. There is no legal or safety homework to do, which is not something you can say about any chemical approach to rodents in Canada — the potent second-generation anticoagulant rodenticides that US websites casually recommend are restricted to commercial applicators here, a landscape we map in the poison sections of our mouse control guide.
The line to watch is products that claim to repel rodents by scent or chemical action — repellent-infused foams and sprays, peppermint-oil pouches, granules. Products making pest-control claims to Canadian consumers generally fall under the Pest Control Products Act and are expected to carry a PCP registration number on the label. We are stating this conservatively on purpose: rather than trusting any brand’s claims (or ours), flip the package over and check for a PCP number before paying for a repellent effect — and note that registration, where it exists, means the product was assessed for safety and its claims reviewed, not that it will outperform a physical seal. In side-by-side reality, no scent product has the track record of a dime-tight building envelope. Buy the mesh first; treat repellents as, at best, a supplement for spaces you cannot seal, like vehicles and sheds.
When DIY Exclusion Isn’t Enough
An honest word on limits. Call in a professional when the entry points are beyond safe reach — rooflines above one storey, chimney caps, wall-void runs; when the droppings and gnaw marks say rat rather than mouse (heavier animal, heavier spec, and burrowing behaviour that DIY screens do not answer — start with our rat guide); or when trapping plus sealing has not produced quiet within a few weeks, which usually means a hidden entry point that an experienced eye will find in minutes. Professional exclusion work in Canada typically runs a few hundred dollars for a standard entry-point package on a detached home, more with roof work — our Canadian pest control cost guide breaks down what fair quotes look like so you can compare against the cost of the kit on this page. For most houses, though, the four materials above, one careful Saturday, and a September date on the calendar are genuinely the whole job.
Frequently Asked Questions
What is a rodent exclusion kit?+
A rodent exclusion kit is the set of physical materials you use to permanently seal mice and rats out of a building instead of endlessly trapping them inside it. A complete Canadian kit has four layers: copper mesh or stainless-steel wool to stuff into gaps and penetrations, exterior-grade sealant to lock the mesh in place and close hairline gaps, quarter-inch galvanized hardware cloth for vents and larger openings, and a rodent-resistant garage-door bottom seal. Some retailers sell all-in-one bundles; most experienced DIYers assemble the pieces individually because the bundle sizes rarely match a real house.
What size gap can a mouse fit through?+
A gap of about 6 mm — the width of a pencil — is enough for a juvenile house mouse, and any opening the size of a dime is a guaranteed doorway for an adult. Mice are not squeezing in the cartoon sense: their skulls are the limiting factor, and a mouse skull clears a surprisingly small hole, with the flexible body following. This is why exclusion fails when people only seal the obvious holes. The dime test is the standard: walk the exterior, and anything a dime could pass through gets sealed. For rats, the benchmark opening is quarter-sized.
Is copper mesh better than steel wool for mice?+
Yes, for anything you want to last more than one season. Ordinary steel wool works briefly — mice hate chewing it — but it rusts fast in a Canadian freeze-thaw exterior, and as it corrodes it shrinks, stains brick and siding with rust streaks, and eventually crumbles out of the gap. Copper mesh does not rust, stays springy so it grips the cavity under tension, and cannot be pulled out in strands the way woven steel wool can. Stainless-steel wool (marketed for pest-proofing, distinct from kitchen-grade) is the other acceptable long-term option. Between copper mesh and stainless wool, either is fine; between either of those and hardware-store steel wool, it is not close.
Can mice chew through spray foam?+
Yes — easily. Bare polyurethane foam is one of the most persistent myths in DIY rodent control: mice and rats gnaw through cured foam in minutes, and a foam-only plug often makes things worse by hiding the hole from you while advertising a freshly disturbed edge to the rodent. Foam has exactly one legitimate role in exclusion: as a carrier and air-sealant applied over a metal core. Stuff the gap with copper mesh or stainless wool first, then foam or caulk over it. The metal stops the teeth; the foam stops the draft. Foam labelled "pest blocker" follows the same rule — check whether it actually contains a physical deterrent, and never trust foam alone.
When should I seal my house against mice in Canada?+
September — before the October move-in, not after it. Rodent entry into Canadian homes is sharply seasonal: as overnight temperatures start holding below about 10°C, outdoor food sources collapse and mice actively probe structures for warmth. Pest control companies across Ontario see the call spike land in October and November every year. Sealing in September means you are closing doors on a building that is still mostly empty; sealing in November often means sealing mice in. If you are reading this in summer, you are early — which is exactly the right time to order materials and do the inspection walk in good weather.
How do I mouse-proof brick weep holes without blocking them?+
Never seal weep holes solid — they are drainage and ventilation openings that let moisture escape the cavity behind brick veneer, and caulking them shut can cause moisture damage and mould inside the wall. The correct fix is a barrier that passes air and water but not rodents: purpose-made stainless or plastic weep-hole covers that tap into the opening, or small rolled pieces of quarter-inch hardware cloth or copper mesh inserted into each hole. Do every weep hole on the accessible courses, not just the ones near a corner — mice patrol the whole wall base.
What kind of sealant should I use for rodent exclusion?+
An exterior-grade polyurethane or hybrid (silane-modified polymer) sealant rated for the surfaces you are sealing — masonry, wood, metal — and for Canadian temperature swings. Cheap interior latex caulk shrinks, cracks in the first winter, and peels off masonry. The sealant is not the rodent barrier — teeth beat any caulk — it is the weatherproof lock that holds the metal mesh in place, seals the air gap that attracts rodents in the first place (they follow warm air plumes leaking from your house), and keeps insects out of the same opening. Buy more tubes than you think: a proper whole-perimeter job on a typical detached house runs through several.
How are mice getting into my garage?+
Almost always at the garage door — specifically the two bottom corners, where the rubber astragal seal meets the vertical weatherstripping and almost never closes tight, and anywhere the concrete is chipped under the seal. Standard rubber garage seals are also chewable, and a motivated mouse enlarges a corner gap in one night. The fixes: a rodent-resistant garage-door bottom seal or corner guards designed with chew-resistant material, repairing spalled concrete under the threshold, and treating the garage-to-house door like an exterior door with proper weatherstripping. An attached garage is the number-one staging area for a house infestation, so it is worth doing properly.
Should I seal up my house if mice are already inside?+
Trap first, then seal — or at minimum run both at once with the trap line already working. Sealing a mouse inside your walls does not solve the problem; it relocates it. Trapped inside, mice keep breeding, chew harder to get out (or deeper in), and any that die in wall voids leave a smell that lasts weeks. The clean sequence: set a proper snap-trap line (see our best mouse trap guide), get 5–7 consecutive quiet nights with no catches and no fresh droppings, then do the full exclusion pass. If activity is heavy, run traps and exterior sealing simultaneously — exterior-only sealing rarely traps a mouse with no exit, because active runways usually have multiple openings.
Do rodent exclusion products need Health Canada / PMRA registration?+
No — and that is one of their quiet advantages. Copper mesh, hardware cloth, sealant, and door seals are hardware, not pesticides, so they need no Pest Management Regulatory Agency registration, carry no label restrictions, and can be used anywhere, by anyone, including in rentals and condos. The line to watch: any product that claims to repel or kill rodents by chemical or scent action — repellent-infused foams, pouches, sprays — falls under pest control product rules in Canada, so check the label for a PCP registration number before trusting the claim. If a "rodent repellent" product sold to Canadians shows no PCP number, treat its claims with skepticism. Plain physical barriers sidestep the entire question.
Does exclusion work for rats too?+
Yes — exclusion is, if anything, more important for rats, but the spec sheet gets heavier. Rats pass through quarter-sized openings (versus dime-sized for mice), gnaw far harder, and Norway rats also burrow, so ground-level defence matters more. Use quarter-inch or half-inch galvanized hardware cloth in a heavier gauge, pack larger voids with copper mesh in greater volume, and pay extra attention to the foundation line, sewer and drain penetrations, and under decks and sheds. The inspection walk in this guide covers both species; for the trapping and control side of a rat problem, see our how-to-get-rid-of-rats guide.
What does professional rodent exclusion cost in Canada?+
Typically several hundred dollars for a standard exclusion package on a detached home — sealing identified entry points with metal and sealant — and more where roofline work, chimney caps, or extensive hardware-cloth screening is involved; complex jobs can run past a thousand. That price usually includes the inspection, which is genuinely the hardest part to DIY well. A self-assembled kit of copper mesh, sealant, hardware cloth, and a garage seal costs a fraction of that, so the DIY case is strong if you are comfortable on a ladder and methodical about the walk-around. Our Canadian pest control cost guide breaks down what pros charge so you can sanity-check any quote.
Related Rodent Guides
- How to Keep Mice Out of Your House This Winter
- How to Get Rid of Mice in Canada — Full Playbook
- Best Mouse Trap Canada — Snap vs Electronic vs Catch-and-Release
- How to Get Rid of Rats in Canada
- How to Keep Mice Out of Your Car
- Best Rodent Repellent for Cars in Canada
- Pest Control Cost Canada — What Professionals Charge
Keep reading
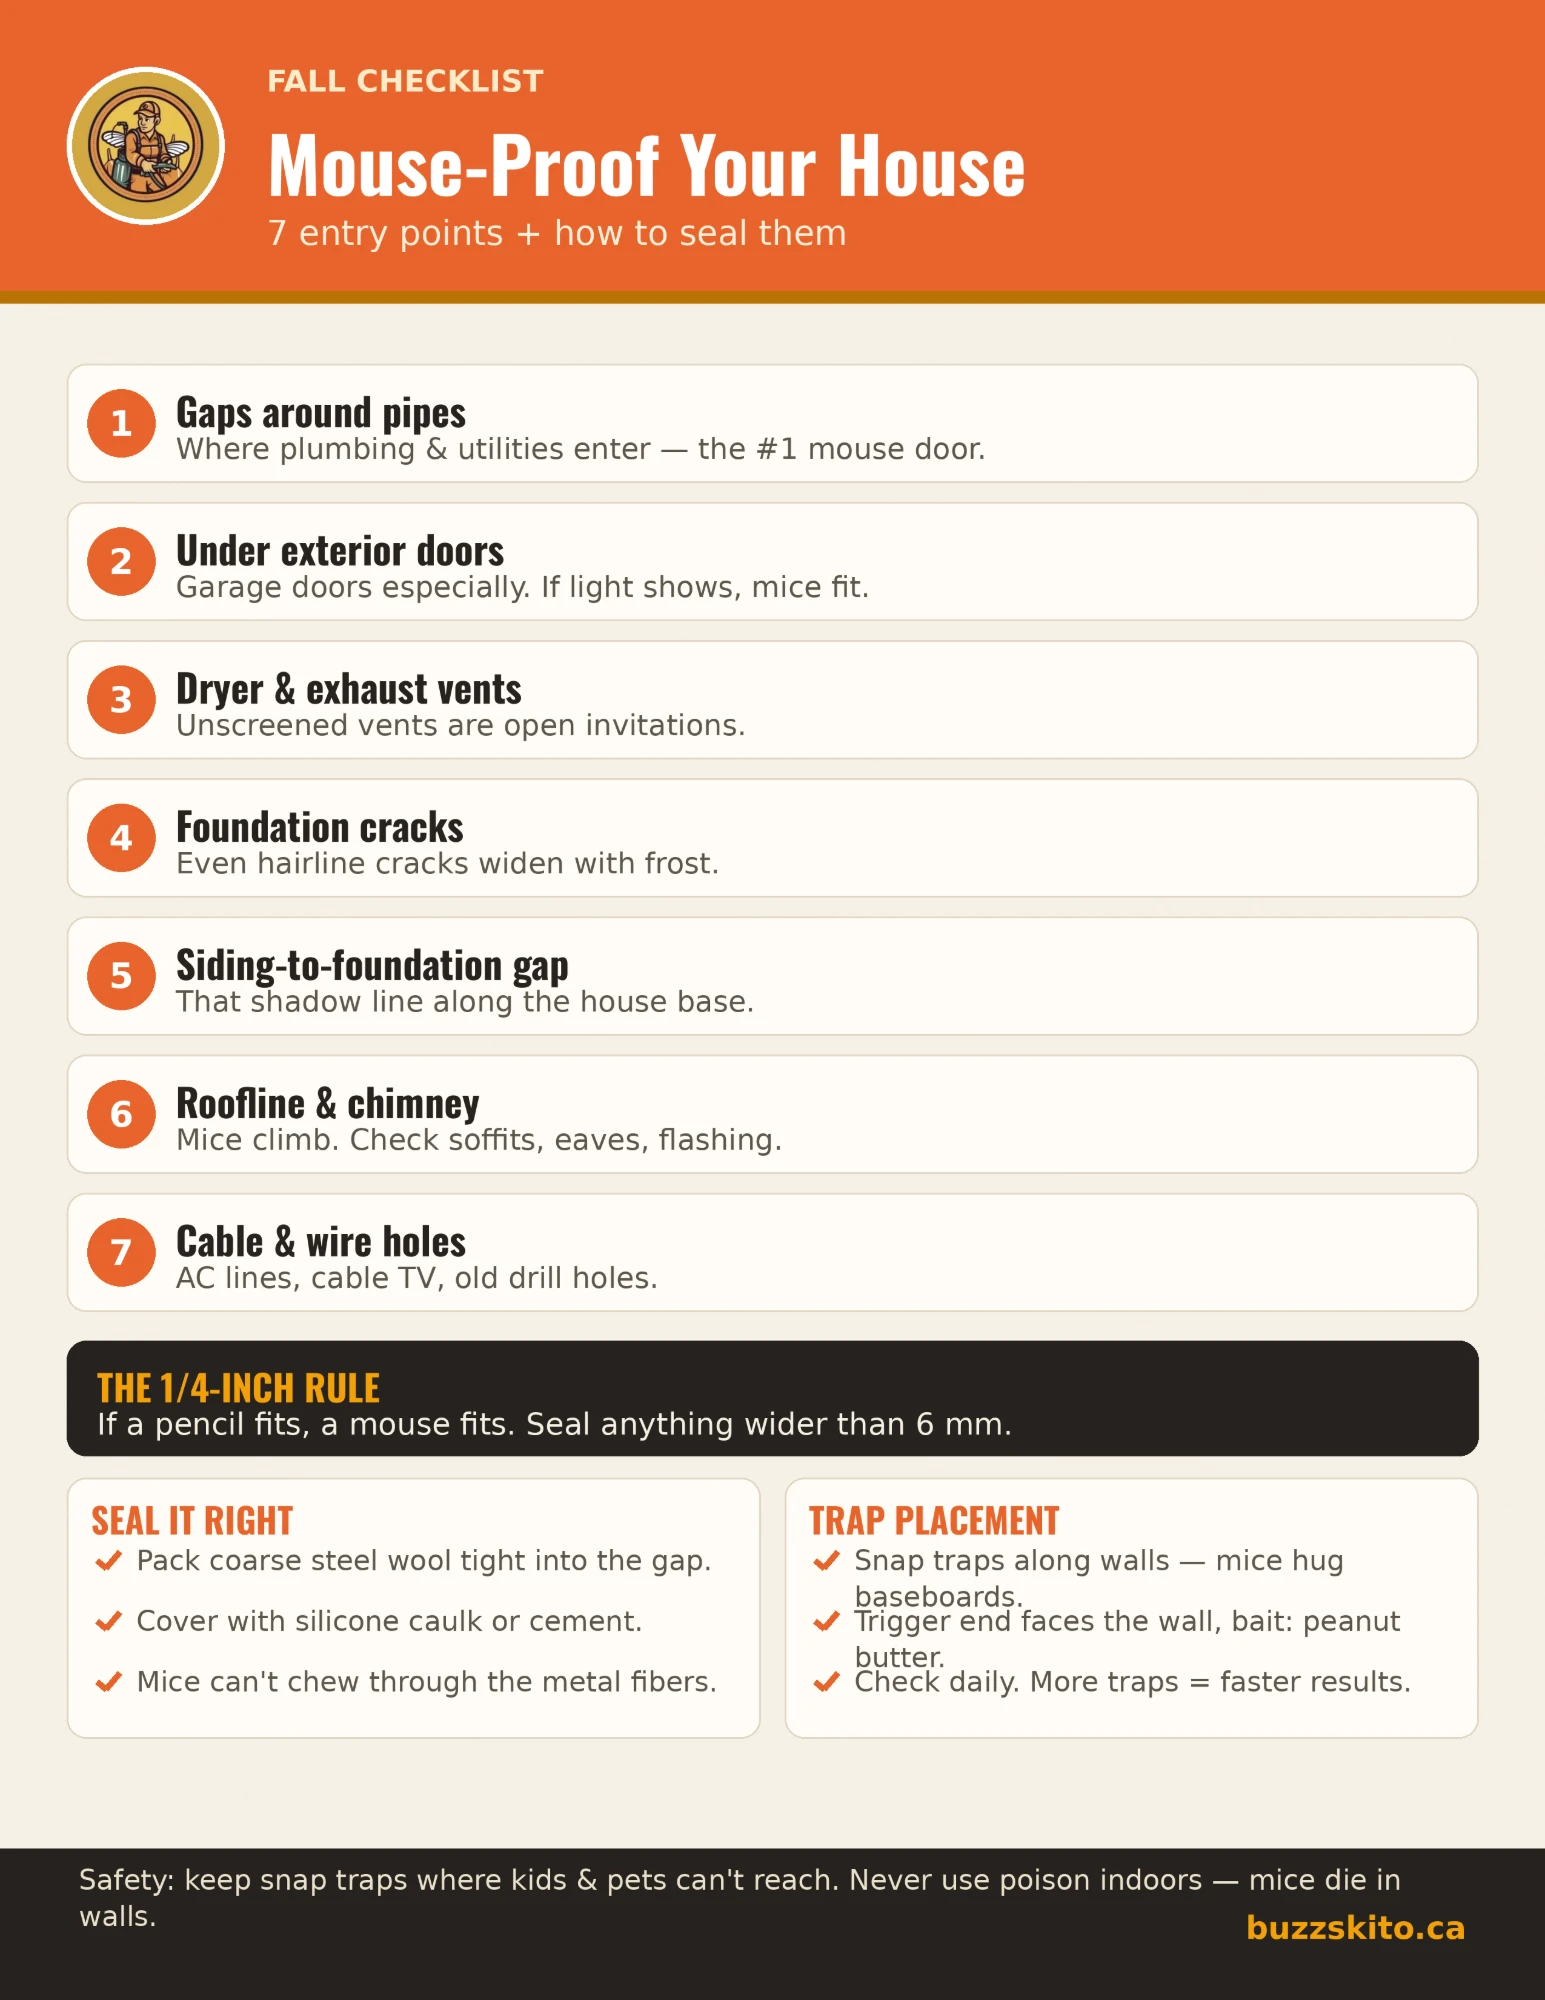 How to Mouse-Proof Your House: A Fall ChecklistA fall checklist for mouse-proofing a house: the 7 entry points to seal, the 1/4-inch rule, the materials that last,…
- How to Get Rid of Rats in Canada (2026) — Traps, Exclusion & What's Actually LegalNorway vs roof rat ID, pre-baited snap-trap technique, the Goodnature A24 auto-trap, rat-proof exclusion, and which…
- Peppermint Oil for Mice: Does It Work, and Is It Safe for Pets?Peppermint oil is a popular mouse remedy, but a research review found plant-compound repellents inconsistent, and CDC…