BuzzSkito Mosquito & Tick Control Specialists · Published July 12, 2026
As an Amazon Associate I earn from qualifying purchases. BuzzSkito only points to products we would genuinely use or recommend, at no extra cost to you.
Why the Tick Check Matters So Much
A tick check is the last and most reliable line of defence against tick-borne illness. In Ontario the tick that matters most is the blacklegged tick (also called the deer tick), the species that can carry the bacteria responsible for Lyme disease. What makes the check so powerful is timing: a blacklegged tick generally has to stay attached for roughly 24 to 36 hours before it can transmit anything. A tick you find and remove the same day has almost always not fed long enough to pass on disease. In other words, a two-minute check tonight can prevent months of illness.
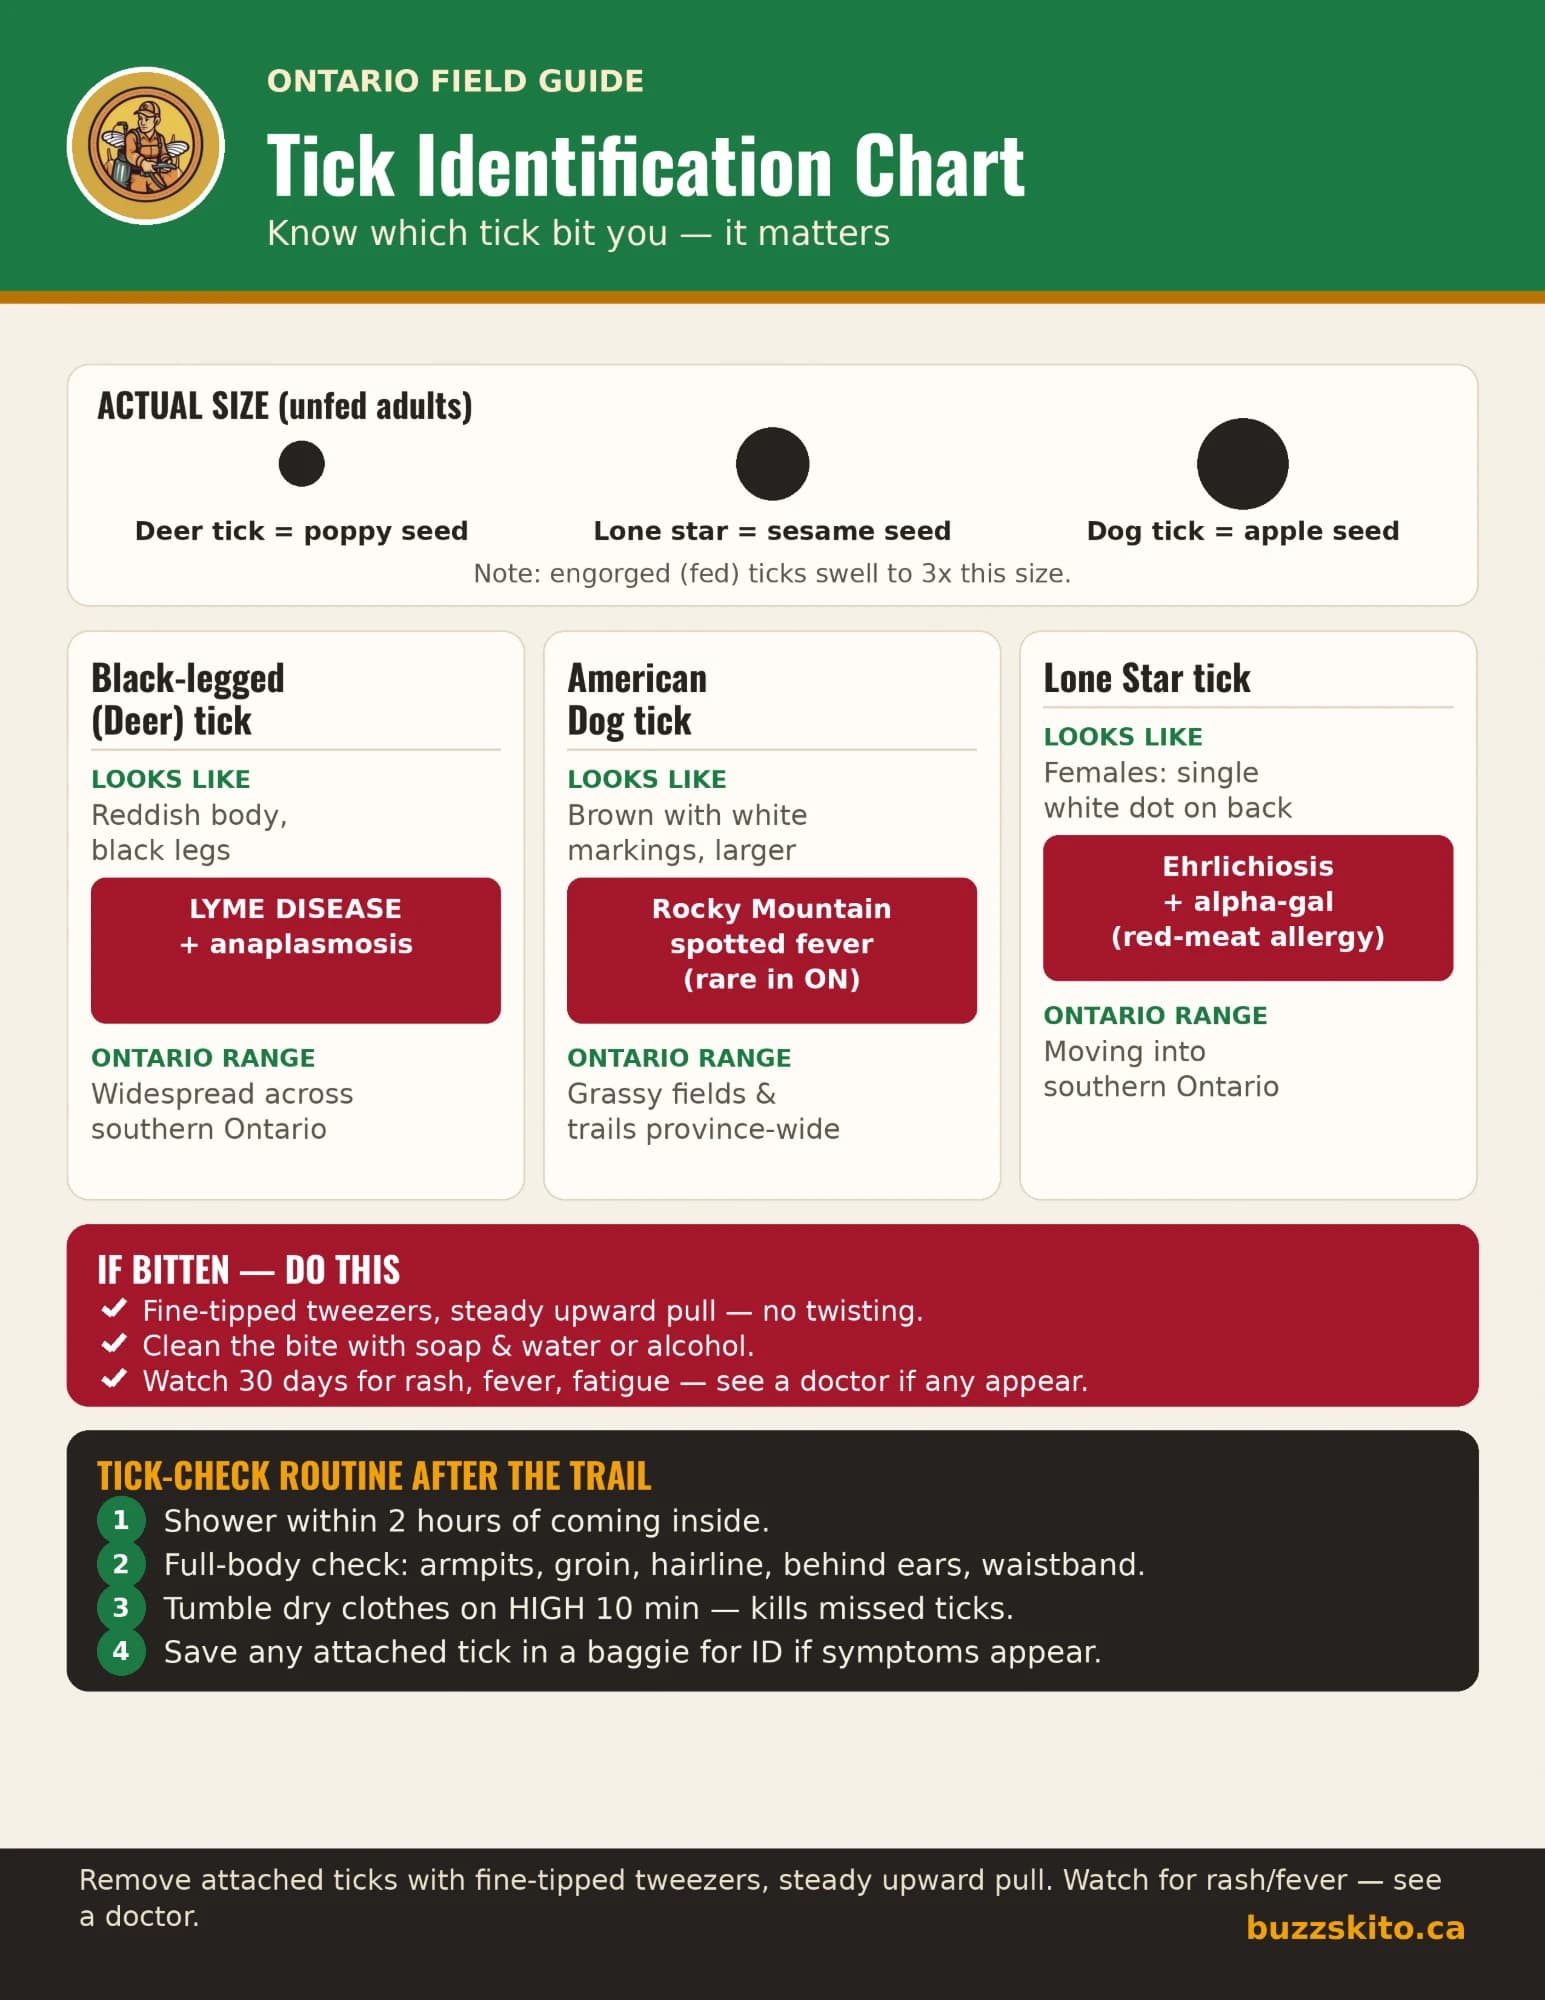
The challenge is size. Adult ticks are about the size of a sesame seed, but the nymphs responsible for most Lyme cases are only as big as a poppy seed. That is why a good tick check is done as much by touch as by sight — you are feeling for a tiny bump that was not there this morning.
The other half of the problem is direction. A tick cannot fly or jump onto you; it boards at ground level from grass, leaf litter or a low branch and then walks upward looking for thin skin, which is why the sock line and ankles matter as much as the scalp. Can ticks fly, jump, or swim? goes through how a tick actually reaches a host, and which of the common stories about them are wrong.
Step-by-Step: The Full-Body Tick Check
Do this within two hours of coming inside, ideally right before or during a shower:
- Toss your clothes in a hot dryer. Ten minutes on high heat kills any ticks still on your clothing before they find you.
- Undress in a well-lit room and grab a full-length mirror plus a hand mirror for the spots you cannot see.
- Start at the head. Run your fingers through your hair and over your scalp and hairline, then check behind and inside the ears and the back of the neck.
- Work downward. Underarms, belly button, waistband and beltline, then the groin and between the legs — the warm, hidden folds ticks prefer.
- Finish at the legs and feet. Behind the knees, down the shins, around the ankles and sock line, and between the toes.
- Shower. A shower within two hours rinses off unattached ticks and gives you a natural moment to feel for anything new.
Step one is deliberately first. It is the dryer, not the washer, that kills a tick on fabric: dry heat desiccates them within about ten minutes, while an ordinary wash cycle frequently leaves them alive to crawl out later. The tested temperatures behind that are in our guide to do ticks die in the washing machine.
Checking Kids
Children are closer to the ground and often the first in the household to pick up a tick, so make the check part of the after-outdoors routine. Look over the whole body, but spend extra time on the scalp and hairline, behind and inside the ears, the back of the neck, the armpits, the belly button, and behind the knees — the areas a tick reaches quickest on a smaller frame. Keeping it light (a quick “tick patrol”) helps kids stay calm while you get a thorough look. Use your fingertips and a bright light, since a nymph can look like nothing more than a new freckle.
Checking Dogs and Cats
Pets bring ticks indoors, so they need a check too. Slowly run your hands over the whole animal, pressing gently to feel for bumps under the fur. Concentrate on the ears and inside the ear flaps, around the eyes and muzzle, under the collar, the armpits and groin, between the toes, and under the tail. Part thick coats to see the skin. Talk to your veterinarian about tick-prevention products made for pets — and never apply human repellents to animals.
Once you feel a bump, the next question is what it actually is. Our photo guide to what a tick looks like on a dog puts unfed and engorged ticks side by side and covers the lookalikes people mistake them for — skin tags, scabs, and fleas.
The reason the pet check earns its place in the routine is that dogs are susceptible to the same infection people are, and the signs arrive late and vaguely — a shifting lameness weeks or months after a bite rather than a rash. Can dogs get Lyme disease from ticks? walks through the early signs, the stages, and what your vet can do.
Your After-Hike Routine (In Order)
- Before you go: tuck pants into socks, wear light colours so ticks show up, and consider factory permethrin-treated clothing (consumer permethrin sprays for treating your own clothes are not registered for that use in Canada). Use a DEET or icaridin (picaridin) repellent on exposed skin.
- Leaving the trail: do a quick visual sweep of your lower legs, waistband, and each other in the group.
- Reaching the car: brush off pants and check the seats — do not carry a hitchhiker home.
- Within two hours home: clothes in the hot dryer, then a shower and the full-body check above.
- Check your gear and pets: backpacks, blankets, and the dog all catch ticks that later crawl onto people.
What to Do If You Find a Tick Attached
Do not panic and do not use old folk remedies (petroleum jelly, nail polish, or a lit match) — those can make the tick release more saliva and raise your risk. Instead, remove it promptly and cleanly:
- Grip the tick as close to the skin as possible with fine-tipped tweezers or a dedicated tick-removal tool.
- Pull straight up with steady, even pressure. Do not twist or jerk — that can leave mouthparts behind.
- Clean the bite area and your hands with soap and water or rubbing alcohol.
- Note the date. If you can, save the tick in a sealed bag or take a clear photo — it helps if symptoms appear.
- Watch the bite for 30 days. See a doctor if you develop an expanding (often bull’s-eye) rash, fever, fatigue, or joint aches.
Keeping a proper tool by the door makes removal quick and clean when it counts. Check tick-removal tools on Amazon.ca →
If the body lifts away but a dark speck stays in the skin, those are the mouthparts — a common outcome, and far less alarming than it looks. See what to do when a tick head stays stuck in the skin for how long it usually takes to clear on its own and which signs are worth a doctor’s visit.
As an Amazon Associate I earn from qualifying purchases. Price shown on Amazon.ca, at no extra cost to you.
🏆 Our Top Pick
8.7/10· BuzzSkito ratingA dedicated tick tool grips right at the skin and lifts the whole tick out cleanly — the single most useful thing to keep by the door in tick season, so you are never improvising with fingernails at the moment it matters.
Pros
- Grips close to the skin to avoid leaving mouthparts
- Removes even poppy-seed-sized nymphs
- Compact — lives by the door or in a pack
Cons
- Fine tips can bend if forced
- Still need soap or alcohol to clean the bite after
Related Reading
- Tick Removal Tool Guide — Best Tools + How to Use Them
- How to Keep Ticks Out of Your Yard (Ontario)
- What Ticks Look Like in Ontario
- Tick Season in Ontario — When Ticks Are Active
- Are Ticks Dangerous in Ontario?
- BuzzSkito Tick Control Service
Frequently Asked Questions
How do you do a proper tick check?+
Do a full-body tick check within two hours of coming indoors. Undress and, using a mirror and good light, run your fingers over every part of your body feeling for a tiny bump the size of a poppy seed or sesame seed. Check the hidden, warm spots first — in and around the hair and scalp, behind and inside the ears, the back of the neck, under the arms, inside the belly button, around the waist, the groin, and behind the knees. A shower right after also helps rinse off unattached ticks and gives you a reason to check.
Where do ticks hide on the body?+
Ticks crawl upward and settle in warm, moist, hidden folds of skin. The most common attachment spots are the scalp and hairline, behind and inside the ears, the back of the neck, the armpits, inside the belly button, around the waistband, the groin and between the legs, and behind the knees. On children, check the head, neck, and behind the ears especially carefully because kids are shorter and ticks reach those areas more easily.
How long do I have to find a tick before it transmits disease?+
In Ontario, a blacklegged (deer) tick generally must stay attached for about 24 to 36 hours before it can transmit the bacteria that cause Lyme disease. That window is exactly why a same-day tick check works so well — a tick that has just latched on has usually not fed long enough to pass anything on. Finding and removing it within 24 hours dramatically lowers your risk. Check the Government of Canada Lyme disease resource for current guidance.
How do I check my kids for ticks?+
Make it part of the routine after any time in grass or woods. Have the child undress and check the whole body, paying extra attention to the scalp and hairline, behind and inside the ears, the back of the neck, the armpits, the belly button, and behind the knees — the spots ticks reach fastest on a smaller body. Use your fingertips to feel for a tiny bump, and use a bright light. Turning it into a quick, calm game (a "tick patrol") keeps kids from being frightened while still getting a thorough look.
How do I check my dog for ticks?+
Run your hands slowly over your dog's whole body, pressing gently to feel for small bumps. Concentrate on the ears and inside the ear flaps, around the eyes and muzzle, under the collar, the armpits and groin, between the toes, and under the tail. Long or thick coats hide ticks, so part the fur and look at the skin. Ask your veterinarian about tick-prevention products for pets — the product a dog uses is different from what people use, so never apply human repellents to pets.
What should I do if I find a tick attached?+
Remove it promptly. Use fine-tipped tweezers or a dedicated tick-removal tool to grip the tick as close to the skin as possible, then pull straight up with steady, even pressure — do not twist, jerk, or crush it. Clean the bite and your hands with soap and water or rubbing alcohol. Do not use petroleum jelly, nail polish, or a hot match; those old methods can make the tick release more saliva. Note the date, and watch the bite for 30 days for an expanding rash or flu-like symptoms.
Should I do a tick check after every time outside?+
Do a full check after any time spent in tall grass, leaf litter, brush, or wooded areas — the places ticks quest. For a quick walk on a mowed lawn or paved path the risk is lower, but a fast look at the lower legs, waistband, and hairline is still worthwhile in tick season (roughly April through November in Ontario). During peak months, a daily check after outdoor time is the single most reliable way to prevent tick-borne illness.
Can ticks be too small to see?+
Nymph-stage blacklegged ticks are only about the size of a poppy seed, so they are easy to miss — which is why so many tick checks rely on touch as much as sight. Run your fingertips slowly over the skin; a nymph feels like a tiny new freckle or scab that was not there before. Good lighting, a hand mirror for hard-to-see areas, and a shower right after coming inside all make small ticks far easier to catch.